| |
Applies To |
|
|
| |
Product(s): |
SewerGEMS, SewerCAD |
|
| |
Version(s): |
CONNECT Edition, V8i |
|
| |
Area: |
Layout and Data Input |
|
| |
Original Author: |
Jesse Dringoli, Bentley Technical Support Group |
|
Overview
This TechNote describes how the Flow Monitoring Distribution method works and how to use it to import your loads in the LoadBuilder module for either SewerCAD or SewerGEMS.
Background
In SewerGEMS and SewerCAD, LoadBuilder can be used to import sanitary loads using many different methods. Flow monitoring distribution should be used if your loading data consists of shapefiles representing monitored flows. All of the other LoadBuilder methods work with actual individual metered loads, where the loading data represents flows directly entering customer locations. Monitored flows represent flows that were measured by a meter at a certain location inside the piping of a sewer network. So, the downstream-most meter will represent the flows from everything upstream of that point, NOT a single load that entered that specific point.
How the Flow Monitoring Distribution Method Works
The Flow Monitoring Distribution method assigns loading data from a point load monitoring layer to upstream loading nodes. It automatically identifies all the upstream manholes up to its adjacent next upstream load monitor, works out the subtotal load contribution of the manhole between the load monitors (i.e., the load difference between the monitors), and then equally distributes the effective load to all the contributing manholes.
To visually explain what this means, take the following network:
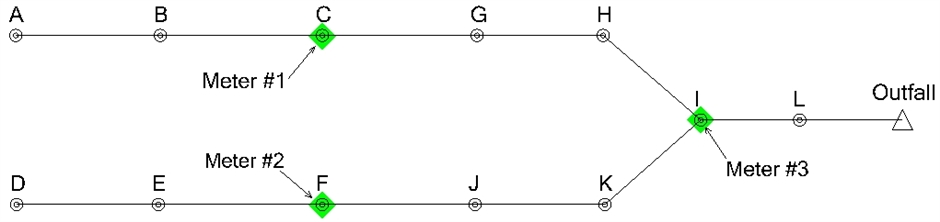
Note: the green diamonds represent the locations of the meters in a point shapefile. If the meter locations did not fall exactly on top of a manhole, LoadBuilder would calculate the nearest node (manhole) and use that.
Assume the following monitored flows:
Meter #1 - 100 gpm
Meter #2 - 150 gpm
Meter #3 - 550 gpm
This means that the flow through the piping under manhole C was 'monitored' as 100 gpm, the flow under manhole F as 150 gpm and the flow under manhole I as 550 gpm. So, since Meter #3 is the downstream-most meter, we can say that the total load upstream of that point is 550 gpm. This means that in the end, the total loads entering the system will add up to 550 gpm.
So, LoadBuilder must compute what the individual loads for each manhole would be, in order for the above to be true. Starting from upstream:
• Total flow at Meter #1 is 100 gpm. Since 3 manholes (A, B and C) are upstream, each would need to have 33.33 gpm (100 / 3 = 33.3)
• Total flow at Meter #2 is 150 gpm. Since 3 manholes (D, E and F) are upstream, each would need to have 50.0 gpm (150 / 3 = 50.0)
• Total flow at Meter #3 is 550 gpm, which is 300 gpm more than the total of the 2 other meters. Based on this, we know that there is 300 gpm (550 - 250 = 300) coming into the system somewhere between it. Since there are 5 manholes between them, (G, H, I, J and K) each of those manholes would need to have 60.0 gpm (300 / 5 = 60.0)

How to use this method in LoadBuilder
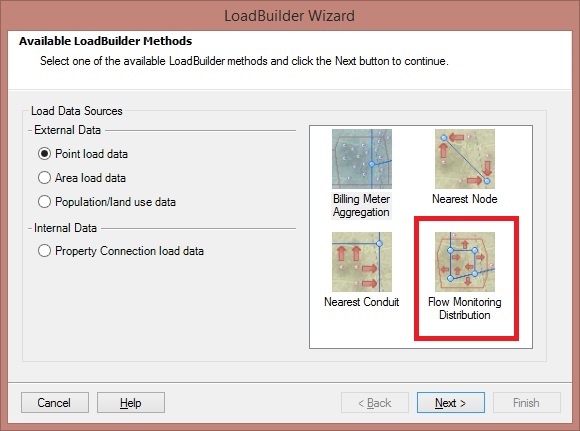
1. In the LoadBuilder wizard, select Flow Monitoring Distribution under the "Point load data" section.
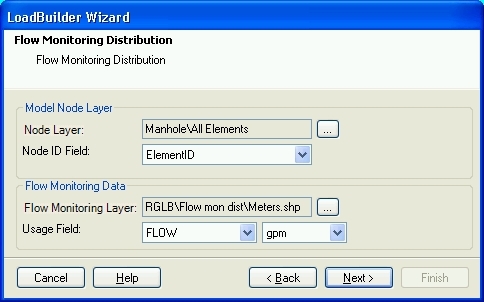
2. For the "Node Layer," select which elements the loads will be assigned to. Typically this will be "Manhole\All Elements", meaning all the manholes. If you have a selection set of loadable manholes, select "Manhole\<NAME>", where "<NAME>" is the name of the selection set.
- Leave the "Node ID Field" as "ElementID".
- For the "Flow Monitoring Layer," select the shapefile (or point feature class, if using the ArcGIS-integrated mode) that contains the flow monitoring meter data.
- For the "Usage Field," select the attribute that contains usage data. The usage field in the source database must contain flow data. Be sure to select the correct unit as well.
3. Click Next and LoadBuilder will compute the total load that will be assigned to the manholes. In our example case, this is 550 gpm. If you need to apply a global pattern or multiplier to that total value, you can do so by entering a multiplier or pattern in the appropriate columns.
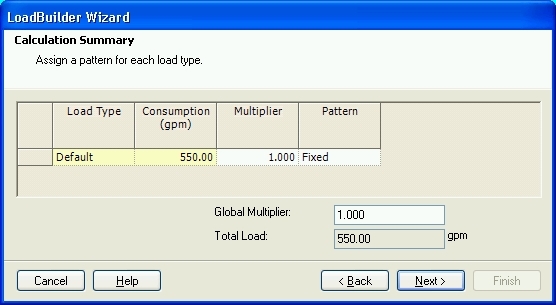
Note: If you need to change the flow unit in the above window, right-click the column header for "Consumption", select "Units and Formatting," choose the appropriate unit and click OK.
4. Click Next and LoadBuilder will compute the load allocations. A summary window will show you each manhole's load. If you need to assign a different pattern to each one, you can do so here.
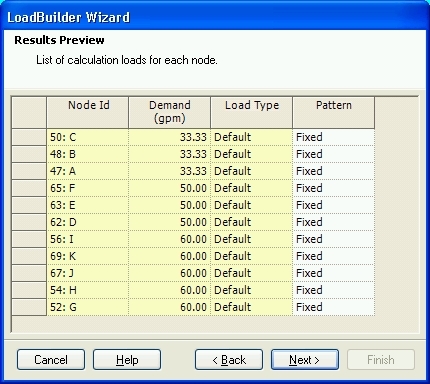
Notice that no load was assigned to manhole L. This is because it is downstream of the downstream-most meter. LoadBuilder has no way of knowing what the metered flow is here, and assumes it is the same as the downstream-most node (550 gpm in this case.) Thus, no additional loads enter the system at that downstream point.
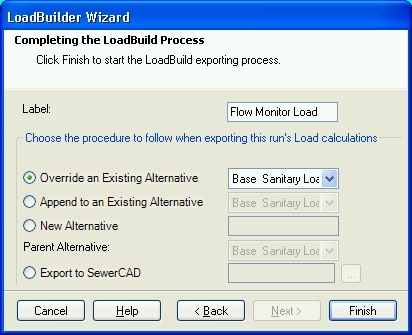
5. Click Next and you will be given several choices as to where the new loads will be imported to. If you would like these new loads to override the loads already present in a particular Sanitary Loading alternative (such as the one associated with the current scenario), then select "Override an Existing Alternative" and select the alternative. If you would like the new loads to be added to loads already present in a particular Sanitary Loading alternative, select "Append to an Existing Alternative" and select the alternative. If you would like to create a new alternative to store the new loads (and later assign it to a particular scenario), select "New Alternative" and enter a name. In this case, we will select to override:
6. Click Next and LoadBuilder will import the new loads into the desired alternative. You will be presented with a summary window, where you can view statistics and any problems that may have occurred.
7. At this point, you can close LoadBuilder, check or assign your alternative, and view your loads using the Sanitary Load Control Center (for CONNECT Edition, Components > Loading > Sanitary Load Control Center; for V8i, Tools > Sanitary Load Control Center.
See Also
Troubleshooting and Understanding LoadBuilder
How do each of the LoadBuilder methods work?
New demands or customer meter assignments not showing up after running LoadBuilder