| Product(s): |
WaterGEMS, SewerGEMS, HAMMER |
| Version(s): |
V8i, CONNECT Edition |
| Area: |
Layout and Data Input |
Problem
How can I control the display of Active Topology for elements on the ArcGIS Pro and ArcMap Platform?
Background
The display inactive topology setting for Bentley products (WaterGEMS, SewerGEMS, HAMMER) in ArcMap or ArcGIS Pro works differently than it does in the standalone products. In standalone, when an element is set to be inactive ("Is Active?" = False), it will display as configured in the Options menu (Tools > Options > Global tab), which is typically either a gray color, or non-visible. When using these products in ArcMap, with the default configuration, setting elements to be inactive will only toggle the "Is Active" attribute in the GeoTable and will not automatically control the actual visibility in the network view.
The workflow between ArcGIS Pro and ArcMap is a little different. You can find the steps for each below. Note: In order to integrate with ArcGIS Pro, you will need WaterGEMS version 10.03.02.75 and SewerGEMS version 10.03.03.44. The steps below use WaterGEMS as an example.
WaterGEMS and SewerGEMS for ArcGIS Pro
If you have not already done so, go apply the Join GeoTables function by going to the WaterGEMS tab, then choosing Join GeoTables > Add Joins.

This step is also used to apply color coding and flow arrows.
Once this is completed, you can display active topology in the model by going to the WaterGEMS-View tab and select Apply Active Topology > Apply Active Topology.

WaterGEMS, SewerGEMS, and HAMMER for ArcMap
There are two ways to view and edit the display of active topology for elements in the ArcGIS/ArcMap platform.
Option 1 - Use the Renderer feature
This is the intended approach and tends to be the most straightforward.
- Enable "Apply [Product] Renderer" and "Auto Refresh". To enable these settings, open the "Bentley [Product]" menu, select View and select each setting. A checkmark next to the setting indicates it's enabled.
- To control how inactive elements display in the drawing view, open the Bentley [Product] menu, select Tools, and click Options. In the Options dialog, select the Global tab. Unchecking the box next to Display Inactive Topology will remove inactive elements from the drawing (they will disappear) and the box to the right controls the color inactive elements will display with.
- At a later point if you apply other color coding to elements (for example to color by pipe diameter) you will need to re-apply the Renderer (step 1). Note that our development team will investigate the possibility of improving the product to prevent the Renderer from having to be re-applied each time, for a future version. Reference # 1089825.
Option 2 - Use ArcMap's Layer Symbology
Notes:
- The steps below will need to be completed for each Layer (i.e., OpenFlows element type).
- The symbology defined using this method will not be applied when "Apply [Product] Renderer" is enabled. Using WaterGEMS as an example, this would be going to the Bentley WaterGEMS menu in the Toolbar, then View > Apply WaterGEMS Renderer).
- This will not be re-applied to the network view when re-opening the project, until the project is re-loaded from the Hydraulic Model Manager.
Steps:
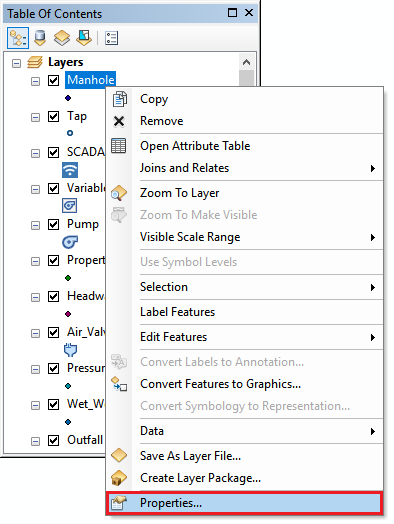
- In the ArcMap table of contents right click on a layer, and select Properties. on the pop up dialog box and click on the Symbology tab of the layer properties dialog.
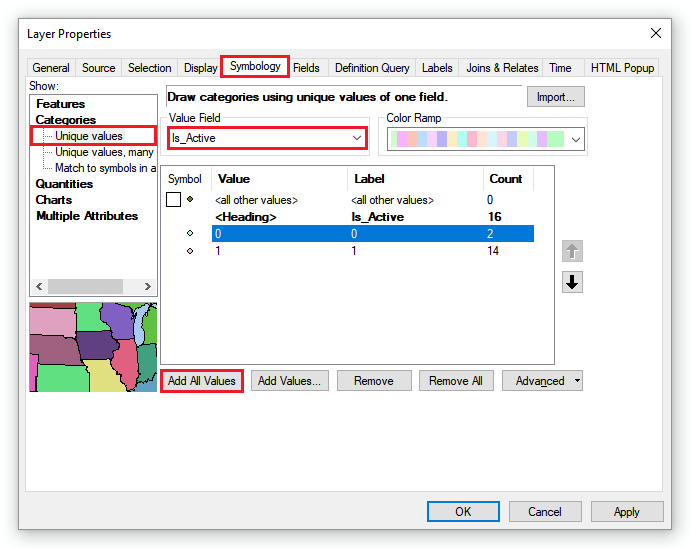
- In the Layer Properties dialog select the Symbology tab, click on Categories in the left pane and select Unique values.
- In the Value Field dropdown menu select Is_Active and then click Add All Values. After doing this, <Heading> and two new symbols should appear (0-Inactive, and 1-Active). Uncheck the box next to <all other values> to remove that unnecessary value from the Table of Contents dialog.
- To change the icon and color that the inactive and active elements will display with, double-click in the symbol column next to the corresponding value. To prevent inactive elements from displaying, set the color to No Color.
- Repeat this process for each layer (i.e., element type).
- Make sure to select Apply and OK to save the changes.
Note that when reopening your project at a later time, these settings will not apply until the model has been properly re-loaded using the Hydraulic Model Manager from the Bentley product's View menu.
See Also
Active Topology Management
WaterGEMS for ArcGIS Pro and WaterGEMS for ArcMap FAQ
SewerGEMS for ArcGIS Pro and SewerGEMS for ArcMap FAQ