| |
Applies To |
|
|
| |
Product(s): |
WaterGEMS, SewerGEMS, HAMMER |
|
| |
Version(s): |
V8i, CONNECT Edition |
|
| |
Environment: |
ArcMap, ArcGIS Pro |
|
| |
Area: |
Modeling |
|
| |
Original Author: |
Akshaya Niraula, Bentley Technical Support Group |
|
The steps below will show how to create a new project in the ArcMap or ArcGIS Pro integrated versions of WaterGEMS, SewerGEMS, and HAMMER. To integration with ArcGIS Pro, you will need WaterGEMS version 10.03.02.75 and SewerGEMS version 10.03.03.44. HAMMER does not integration with ArcGIS Pro at this time.
The examples below use WaterGEMS as an example, but the general steps are the same for all products.
WaterGEMS and SewerGEMS for ArcGIS Pro
After opening WaterGEMS for ArcGIS Pro, open a new or existing project. If you are using an existing project, make sure it does not already have a WaterGEMS model associated with it. Once the project is open, go to the WaterGEMS tab, and select Hydraulic Models > Add New Hydraulic Model.

Browse to where the model will be saved and give is a name. This will create the WaterGEMS files. Note that you do not have to use the same name as the ArcGIS Pro file, but it may make keeping track of the files simpler.
After creating the WaterGEMS file, a dialog will open where you create a geodatabase (GDB) file. This will have the same name as the model you are creating. You will also be able to select coordinate system. This file will be saved in the same location as the WaterGEMS model file, though you can specify the geodatabase file name and the file location, for simplicity using the same location and file name as the WaterGEMS file is convenient.
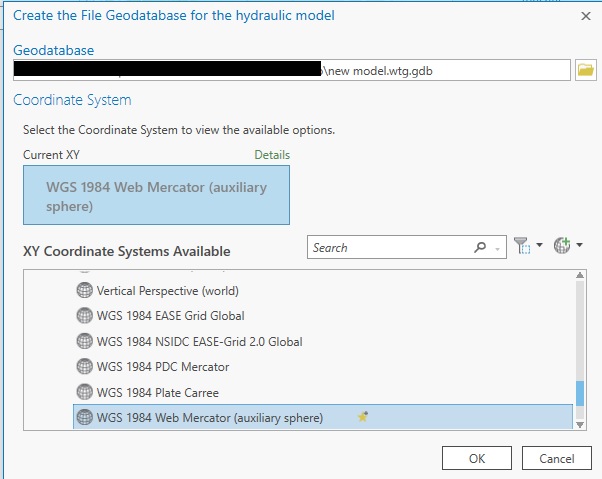
There is an Import option where you can select another shapefile or geodatabase file to add the coordinate system used in that file. Click the Add Coordinate System button, then select Import Coordinate System.

Once you have created the model file and the added the geodatabase file, you will be ready to create your model by using the Water-Layout tab or by using ModelBuilder.
WaterGEMS, SewerGEMS, or HAMMER for ArcMap
1) Open WaterGEMS for ArcMap.
2) Click the WaterGEMS menu, choose Project > Add New Project (or New Hydraulic Model).

3) Choose a name for the project and location to save the WaterGEMS model. Click the "Save" button to proceed to the next step.
4) Click the blue folder icon in the 'Attach Geodatabase' window to create a new geodatabase
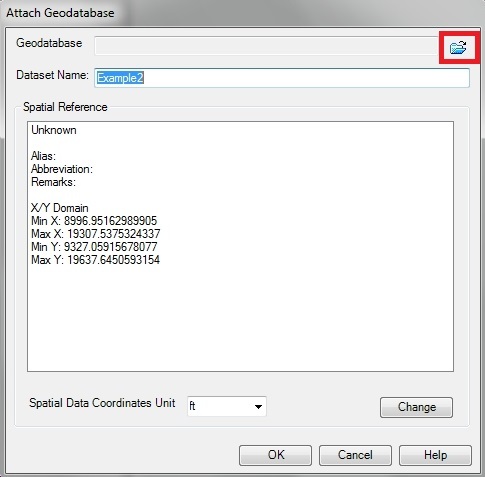
This is necessary because WaterGEMS interacts with ArcMap through this separate personal geodatabase (.mdb file). Note: If you get a message that says "WaterGEMs project cannot be a geodatabase" this means that the name you tried to give your geodatabase has the .wtg extension in it. Simply remove the extension and your new geodatabase will be created.
Ensure that you assign the correct coordinate system/spatial reference, before clicking OK in the 'Attach Geodatabase' window.
When you click the "OK" button, the Table of Contents will be populated with the layers for WaterGEMS element types and you can now lay out or import your WaterGEMS model.
See Also
Opening an existing WaterGEMS or SewerGEMS model when integrated with ArcMap or ArcGIS Pro
How do I open a WaterGEMS or SewerGEMS model that is already associated with an ArcMap MXD file or ArcGIS Pro APRX?
WaterGEMS and SewerGEMS for ArcGIS Pro and WaterGEMS and SewerGEMS for ArcMap FAQ