Option 1 - Updating Outflow Elements - CONNECT Edition and higher
If you need to automatically assign catchment outflow elements (the node that received the respective catchment runoff), and you are using CONNECT Edition, this can be done with the Catchment Delineation feature. Note that this feature will create new catchments based on a terrain model, and will associate them with catchbasins at the point where the upstream catchment area drains to.
Assigning the outflow node of existing catchments cannot be easily done because the terrain would need to be considered to determine the collection point. This will be considered for a future version (reference # 308754).
Option 2 - Updating Outflow Elements - outflow nodes known
In order to use this option you will need to know the labels of the outflow elements that you'd like to associate with each catchment.
To associate outflow elements with catchments you can use ModelBuilder with a simple spreadsheet using the steps below:
*Note that this association can be done with any of the other types of files that ModelBuilder accepts by adapting the process to your file type
1) Download this spreadsheet: Catchment_Outflow_Element_Association
2) Input all your catchment labels in the appropriate column and do the same with ouflow element labels. Save and close the file.
3) Open ModelBuilder (Tools > ModelBuilder) and start a new run.
4) Choose Excel 2007 (12.0) for your datasource type (or choose the appropriate datasource)
5) You are only working with Sheet1, so uncheck the boxes in front of Sheets 2 and 3.
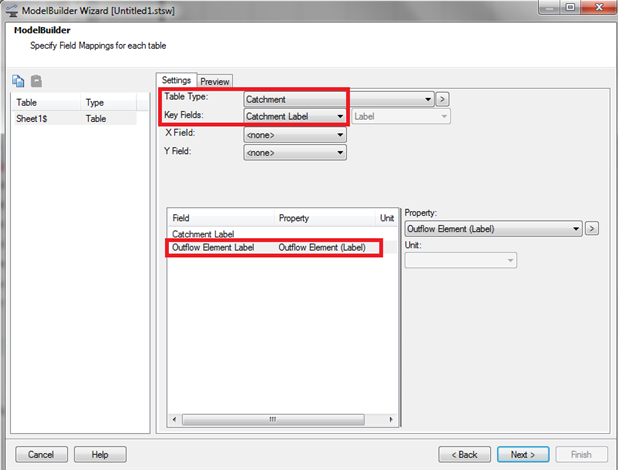
6) Hit the Next button until you get to step 5 for performing the field mapping associations
7) Change your table type to "Catchment" and set the Key Field to "Catchment Label"
8) In the mapping section set "Outflow Element Label" to "Outflow Element (Label)". See the screen shot below:
9) Click the Next button and on the last step choose to build your model now.
Option 3 - Updating Outflow Elements - outflow nodes not known
Consider this process if you have a large number of catchments to assign to nearby cathbasins and you do not already have a list of their corresponding outflow nodes. The below process has many steps and requires GIS knowledge to compute centroids from a polygon feature. If you have a relatively small number of catchments, it may be best to assign the outflow nodes manually to the nearest catchbasin.
1) If the catchment source data is not already in shapefile form, create a new catchment flextable (under the Flextable manager section "tables - hydraulic model") with just the label field and export it to a shapefile.
2) Use tools in another application such as ArcGIS / ArcToolbox to convert the catchment polygon centroid to a point shapefile
3) Create a text User Data Extension for your catchbasins called "Catchment"
4) Use ModelBuilder to import the point shapefile into catchbasins with the spatial join option enabled (required CONNECT Edition Update 1 or higher), with the element type set to cathbasin, and map the label field in the shapefile to the new "catchment" user data extension. This will import the catchment labels into the nearest catchbasin. Be sure to set the Tolerance field large enough to capture the catchment centroid that is furthest from its nearest catchbasin (it will find the closest element closest to the tolerance.)
5) Create a new catchbasin flextable (tables - hydraulic model) with just the label and the new "catchment" field and filter it to only show those with a value in the "catchment" field, using the following syntax (note that "Catch_Basin_Field_1" shown below may be a different name depending on how you configured the user data extension - simply double click "catchment" in the left side of the filter window and it will populate with the right name):
Catch_Basin_Field_1 <> ''
6) Copy/paste the information in the filtered flextable to a spreadsheet. (click the gray cell in the upper-left corner of the flextable, then click Copy > Copy with Headers, then paste into Excel) then reset the filter on the flextable.
7) Create a new ModelBuilder run with the new spreadsheet, with the catchment element type, mapping the key field as the "catchment", and the catchbasin label field as the "outflow node". Choose the option to only update elements (not create). Note that if multiple catchments are closest to a particular catchbasin, only one will be updated.
8) Clear all text in the "Catchment" field on the catchbasin flextable by right clicking the column header > select column, the press delete.
9) Open the catchment flextable from step 1 and filter with the following syntax, to only show remaining, unassigned catchments. If any are found, proceed to step 10.
Hydrologic_OutflowNode IS NULL
10) Repeat steps 2-9 (skipping step 3 since the UDX field will already be there)
Option 1 - Updating Time of Concentration
1) Open your catchment flextable and add the Time of Concentration field to it using the edit icon at the top of the window. If you don't know how to do that please read the wiki below or you can go to the help topic in your software titled "Editing FlexTables ".
Customize flex table reports
2) Once you get the field added use the copy (CTRL + C) and paste (CTRL + P) to move that information from another source that you have.
Option 2 - Updating Time of Concentration
The other option is to use our ModelBuilder tool to import the data you'd like to add.
ModelBuilder can use a few different input sources of which CAD files, shapefiles, excel spread sheets, and access databases are some of the more popular choices. ModelBuilder allows you to use fields from your data source origin and map it to the specific fields in your Storm and Sewer software that you'd like to add information to. The wiki below explains the step for how to update a model using ModelBuilder:
Building and updating a model using ModelBuilder
There are also links on the bottom of this wiki that show you how you can use ModelBuilder to build your entire model using the tool as well as using it for a few other functions.
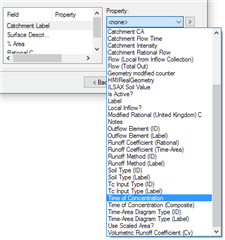
To import Time of Concentration, use the Catchment table type and map your Tc to the "Time of Concentration" field:
Option 3 - Updating Time of Concentration
If you have multiple catchments that are going to use the same Tc value the last option that you can use is our prototype tool. This tool will allow you to have certain default values preset in your elements when you place them on your drawing pane. Note that this option will only work if you are laying out new catchments and does not apply to existing catchments in your model. This wiki technote will explain how prototypes work:
Changing the default property values when creating model
For quickly updating the outflow element you cannot use the copy and paste method or prototypes, but you can use the ModelBuilder option.
See Also
Using Downstream Trace with Digital Terrain Models