
| |
|
|
|
| |
Applies To |
|
|
| |
|
|
|
| |
Product(s): |
Bentley CivilStorm |
|
| |
Version(s): |
08.11.xx.xx |
|
| |
Environment: |
N\A |
|
| |
Area: |
Modeling |
|
| |
Subarea: |
N\A |
|
| |
Original Author: |
Jesse Dringoli, Bentley Technical Support Group |
|
| |
|
|
|
Background
This article explains how to use scenarios and alternatives to model a few common tasks in CivilStorm.
Introduction
Generally speaking, scenarios are simply a collection of alternatives. Alternatives are the building blocks of scenarios. When deciding which alternatives to create, think about what will be different between the scenarios that will use them. If some aspect (such as rainfall) stays the same, those scenarios should simply reference the same “rainfall runoff” alternative.
Situation #1 – Simulating multiple return events in the same model
Follow these general steps if you would like to add scenarios for multiple return events, such as 10, 25, 50, 100 year.
1) First ensure that you’ve created all the necessary rainfall curves under Components > Storm Data
2) Go to Analysis > Alternatives and expand Rainfall Runoff. If you haven’t done anything with alternatives yet in the model, you should only see the base rainfall runoff alternative.
3) Rename the base alternative as your first return event, such as 2 year.
4) At the top of the alternatives manager, click the New button to create a new base rainfall runoff alternative. Name this as your next return event, such as 10 year.
5) Repeat step 4 until you have all the return events you need.

6) Go to Components > Global Storm Data. This dialog is simply an easy way to associate rainfall curves with rainfall runoff alternatives.
7) Select the corresponding rainfall curve next to each rainfall runoff alternative

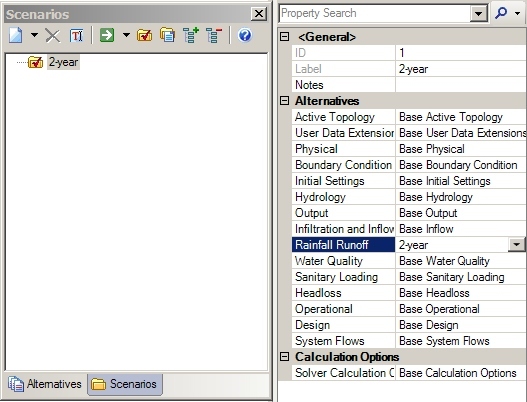
8) Close this dialog and go to Analysis > Scenarios. By default you will only see a “base” scenario.
9) Rename the base scenario to reflect the first return event such as 2-year
10) Double click that scenario and the properties window will appear, showing you the alternatives used by that scenario. Ensure that the 2-year rainfall runoff alternative is selected.
11) At the top of the Scenario manager, click the New button, choose New Base scenario, and name it according to the next return event.
12) Double click the new scenario and select the corresponding rainfall runoff alternative
13) Repeat steps 11 and 12 for all remaining return events.

14) Notice which scenario has a red check mark next to it (2-year in the above screenshot). If you compute the model now with the green compute button, it will compute catchment runoff with the 2-year time-depth curve. If you would like to compute the model with a different return event, either select it in the dropdown at the top-left corner of CivilStorm or right click the scenario in the scenario manager and choose “make current”.
15) If you would like to compute all scenarios in batch, click the black arrow button next to the green arrow button at the top of the scenario manager and choose Batch Run.

Situation #2 – Predevelopment vs. Postdevelopment
Use the below steps to set up scenarios to analyze pre vs post conditions within the same model. The same example data from the previous situation will be used.
1) If you already have base scenarios set up for return events, first navigate to the Alternatives manager
2) Expand Activate Topology, which will only contain a base alternative by default. This alternative controls which elements are turned on or off. Elements that are inactive are ignored and can be set to disappear.
3) Name the base alternative as Predevelopment
4) Right click the predevelopment active topology alternative and choose New > Child. This will create a copy of the base alternative that initially has the same exact settings. As with all alternative types, if you change a setting (in this case whether an element is active or not) in the child alternative, it becomes “local” to that alternative (for that element) and no longer inherits the setting from the base. Settings from all other elements that have not been changed in the child will continue to inherit from the base.
5) Name the child alternative Postdevelopment (or something similar)

6) Navigate to the scenario manager. If you already have scenarios set up for return events, change their name to designate them as predevelopment. Notice in the properties of each scenario that they are using the predevelopment active topology alternative, formally labeled as Base. Note: at this point it is assumed that the predevelopment conditions have been laid out in the model. For example you may simply have some catchments going to an outfall or through a channel and then an outfall.

7) Right click the first return event scenario, choose New > Child – label it as postdevelopment
8) Open the properties of the postdevelopment scenario. Notice since it was created as a child, it initially inherits all the alternative assignments from the parent predevelopment scenario. Change the active topology alternative to Postdevelopment. You do not have to change the rainfall runoff alternative because it was inherited from the base scenario.
9) Repeat steps 7-8 for each return event.

10) Set your active scenario as one of the postdevelopment scenarios and lay out the postdevelopment conditions such as the pond and outlet structure. In the parent active topology alternative, the default status is inactive, so these elements will not be active in the predevelopment conditions. If you still see them showing as gray, go to Tools > Options and toggle the “display inactive topology” check box. If there are elements that exist in the predevelopment conditions but do not in the postdevelopment, either select “false” for the “is active?” property, or use the Active Topology Selection tool to in-activate multiple elements.
Note that if you are changing the outflow element of a catchment, you will need to have a different “Hydrology” alternative between the scenarios. This is because the outflow element setting is stored in the hydrology alternative. Again, think about what you need to change between scenarios, find out which alternative it’s stored in, and create a new base or child alternative of that type to assign between the scenarios.
Situation #3 – existing conditions vs expansion or added elements
In this situation, you may be looking at the existing conditions vs a proposed expansion, where new elements will be added to the model. In this case, the process is the same as situation #2 above, because the determination of whether an element appears and is used in a scenario is designated by its active topology alternative. “Predevelopment” would be “existing conditions” and “postdevelopment” would be proposed expansions.
Note however that if you are keeping the same element between the existing and proposed scenarios but are just changing a physical property such as the diameter, the Physical alternative should be used instead of active topology. Meaning, the existing conditions scenario should have a different physical alternative selected than the proposed conditions. You can use the same base/child relationship as discussed in situation 2 in order for the child to inherit the physical settings established in the base. Otherwise if you make a new base physical alternative, you’ll have to re-enter all physical properties for all elements, even the ones that aren’t changing.
See Also
Scenario and Alternative Management