| Product(s): |
WaterGEMS, WaterCAD |
| Version(s): |
CONNECT Edition, V8i |
| Area: |
Output and Reporting |
Problem
Water age results do not look right, or a strange or unexpected water age result is seen.
Solution
Water age results can sometimes be surprising. Just because a result looks strange does not necessarily mean it is not correct.
Check base hydraulic results
First, start by ensuring the that base hydraulic results are accurate. Check for "network unbalanced" or other red notifications. The model should be in smooth running condition before a water age is attempted, as results will otherwise be skewed.
Consider the element of time
A water age analysis uses an EPS (extended period simulation) which tracks changes over time. At time zero, all water will be new (age of zero) by default. So, you will need to make use of the Time Browser and/or graphs of the calculated age results, to see how the age changes over time.
See also: Results generated for water quality results reported as zero or N/A (Age, Trace, Constituent)
Understand where new water is introduced and old water can remain
New water (age = zero) is introduced into the network at reservoirs and inflows (negative demands). Water stored inside tanks at time zero will continue to age as the simulation progresses, if it does not leave the tank. If you're seeing an unexpected result, it is first important to understand these basic principles.
Also, flow reversals can cause old water to "slosh back and forth". For example a tank that fills and drains based on a pump. If there is a long linear length of pipe leading to the tank, with no demands, then old water may not leave the system before the flow reverses and goes back toward the tank. If conditions change later in the simulation, slugs of that old water may make their way elsewhere in the system, mixing with newer water and creating complex interactions and seemingly strange results.
How to define initial water age in model
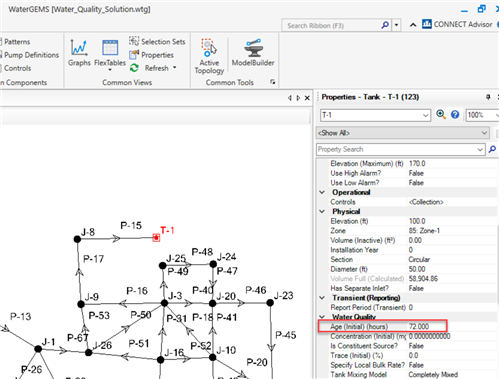
Initial water age can be defined at reservoirs, tanks or junctions through age alternative. Analysis > Alternatives > Age > Enter age (Initial) for tank or reservoirs here. You can enter the age for junctions / tanks individually or right click on the Age (Initial) column > Global Edit > Set the value. Initial water age then will appear in element properties.
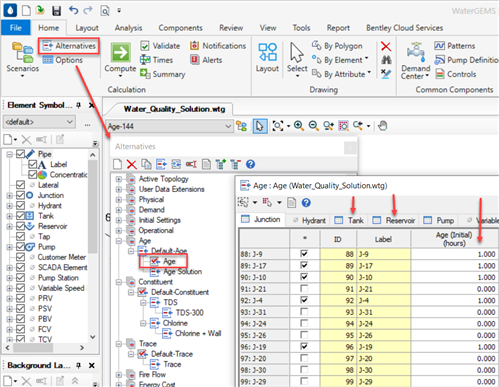
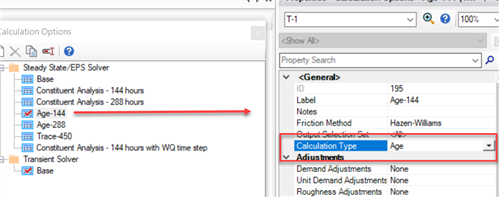
Before computing age scenario be sure, to change the calculation type to Age in calculation options.
After computing the age analysis scenario it is recommended to use color coding to observe the age results visually.

How water age is calculated in WaterGEMS
When you start water age analysis, water age in all pipes and tanks, reservoir is set to zero by default. Since the water is tanks, pipes is not new completely, so it can take considerable time to flush out with new water from the model. In comparison water in tanks take some time to achieve a stable water age, whereas water is pipes quickly ages as volume in any pipe is small compared with tanks.
To shorten the time for a model to stabilize, you can establish the initial conditions for water age. To achieve this, what you can do is make a very long run of model such that all new water has left the system. The results from the final time step then can be copied and pasted into a new set of initial conditions which will enable the model to reach equilibrium much faster. It is not important to set initial age in pipes, but its required to set in tanks, as tanks contain large volume of water.
Water Quality time step
Next, ensure that the calculation timestep and water quality timestep are set appropriately. By default, the water quality timestep is equal to one tenth of the hydraulic time step. If pipes are particularly short or the water age results generally don't look right, use the below steps under "Steps to address issues with short pipes and water quality timestep"
Mass imbalance
If you believe that a mass balance problem is occurring with your water quality results, read the following article:
Mass imbalances in EPANET water-quality simulations (Davis, Janke, Taxon)
Variable area tank with inactive volume
When using the variable area option (instead of constant area for example) for a tank, along with the Inactive Volume field, you may find that water age results are not accounting for the inactive volume. This is because the inactive volume field is for reference purposes only for the variable area option. Inactive volume only applies to constant area / cylindrical tanks. To address this limitation you could either:
- Approximate the tank as a constant area / cylinder
- Explicitly model the varying tank area including the area below the tank operating range. Note that with this approach, because the tank’s minimum elevation corresponds to the bottom of the volume curve, it means that the tank's minimum elevation field will have to be artificially set as equal to the base (i.e., at the bottom of the inactive volume). This may not be a problem if the simulation runs in such a way that the minimum of the actual allowable operating range (what would have been the minimum elevation if not for the workaround) is never reached.
Steps to address issues with short pipes and water quality timestep
1) Open your pipes flextable and edit it to add the following fields: a) Is Active? b) Has user defined length? c) Length (user defined) d) Travel Time (This is the length of the pipe divided by the velocity) e) Length f) Velocity
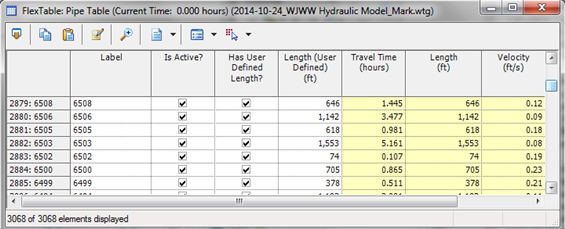
*If you're not familiar with how to edit a flextable please refer the help documentation that comes with the software and look for the document titled "Editing Flextables"
2) After determining if your pipes have a user defined length or scaled length, right click on the appropriate column header, and choose Sort > Ascending. This will bring the shortest pipes to the top of the table.
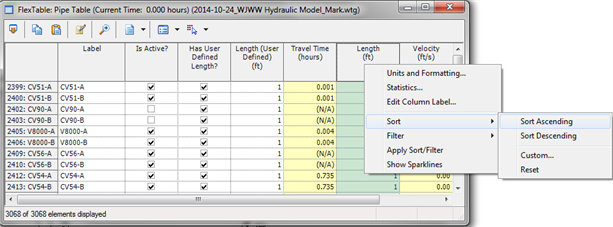
Look at those to see if there are any short pipes, which could be considered any pipe under 10 ft. (3.05 m) for this first round of troubleshooting. An easy way to do this is to use a custom query filter on the "Length" column. This can be done by right clicking the appropriate column header and choosing Filter > Custom.

Your query should have the following syntax: (This example assumes that your model uses scaled lengths)
IdahoPipeResults_PipeUnifiedLength <= 10

If you aren't familiar with how to a create custom query you can have a look at this wiki, which explains a few ways to filer a flextable based on a custom query:
https://communities.bentley.com/products/hydraulics___hydrology/w/hydraulics_and_hydrology__wiki/how-to-globally-edit-certain-elements-in-an-element-flextable
3) Once filtered locate your "Travel Time" column and if necessary change the units to minutes in order to make it easier to understand. The following wiki will show you a few ways to do that if you are unfamiliar with it:
https://communities.bentley.com/products/hydraulics___hydrology/w/hydraulics_and_hydrology__wiki/8169.changing-units-or-converting-units-for-elements
Just as in step 2 sort this column in ascending order and look for pipes with very short travel times (< 30 seconds). The reason we are looking for pipes with short travel times is because these pipes can potentially impact the water age calculation. Too short a travel time can make a graph of the water age in pipes or tanks look like it is increasing exponentially.
4) Choose a few of the pipes that show an short travel time and browse to them in the drawing pane by right clicking on the flextable row header and using the "Zoom to" option. Then right click on a few of those pipes and graph them for the Water Age(Calculated) property to see if it's less than 30 second for the entire simulation. You don't have to do this for all of them, but doing it for a few should give you an idea of the travel times for the other shorter pipes in that general area.
5) With WaterGEMS, consider using Skelebrator to do your best in skeletonizing your model to remove the short pipes with short travel times. This is largely up to engineering judgement. Generally speaking skelebration should not be necessary for a water quality analysis as in most cases pipe lengths are sufficiently long enough to avoid any issues. It is typically only in cases where there are many short pipes and the conditions and timestep are set in such a way that discrepancies occur, that you may need to consider addressing the short pipe situation (either via Skelebration or potentially other means). However, in some cases an adjustment to the water quality timestep may be used instead of Skelebration (see further below), which may be preferable to a physical modification of the pipes. In some cases there is a desire to ensure a 1:1 match between the model assets and the real system.
6) After you finish skeletonizing your model compute it again and use steps 3-4 to check for any pipes that still might have short travel times. If you find any graph them and determine if there is a way to skeletonize the model more to remove them.
7) Compute your model again and this time use step 3 to determine the shortest travel time in your model and note this.
8) Open the calculation options properties (Analysis > Calculation options) and set the "Set Water Quality Time Step?" property to 'True'. You will set the "Water Quality Time Step" field that is revealed to be less than whatever your shortest travel time was in your model. If your shortest travel time was 1 minute then you might enter 30 seconds for the Water Quality Time Step. Doing this will help to assure that the age analysis is able to capture the changes in water age for all your pipes.
9) Compute your model again and observe the results to see if they look better. If they still don't look correct open the calculation options again and try making your "Hydraulic Time Step" and "Reporting Time Step" smaller and then computing again. You can also always try a slightly smaller "Water Quality Time Step" too. Finally, if the results still do not look correct look at the travel times in your pipes and make sure they are also not too large. If you have travel times that look overly large for the length of the pipe look until you can find where the issue starts. Once you find the starting point try to determine what is causing the issue or contact technical support for additional help.
See Also
Discrepancy in the water age results for model with short pipes and short travel times
Mass imbalances in EPANET water-quality simulations