| Product(s): |
Bentley SewerGEMS, SewerCAD, CivilStorm, StormCAD |
| Version(s): |
V8i, Connect Edition |
| Area: |
Modeling |
Background
This wiki article describes the purpose of the Sanitary Load Control Center and the Inflow Control Center. It includes information on how it is used, how to add loading, and why you may see elements listed multiple times.
Workflow
The Control Centers provide a tabular view of all loads in the model. Since a single node can have multiple loads or inflows, they are nested within a "collection", which means the normal Flextables cannot display the loads directly. For example in the manhole Flextable, you will only see the sanitary load collection and the collection count fields, which you need to "drill" into in order to view the loads.
Sanitary loads can be applied to elements like manhole, catch basin, pressure junctions and wet wells through sanitary control center. E.g. if you want to model total sanitary loadings directly at wet wells then it can be done through wet well properties or using sanitary control center. If you have property connections, then sanitary loadings to those can be applied through property connection’s flex table directly.
Whereas inflows i.e. wet weather flows can be applied to elements like manhole, catch basin, cross section, outfall, wet well, catchment, pond, pressure junction and headwalls using Inflow control center.
The Control Centers display one row for each individual load/inflow in the model, so if a node has more than one load or inflow, you will see multiple rows for that particular node; one for each load. In addition to viewing, this allows you to perform actions such as global edits (see link below).
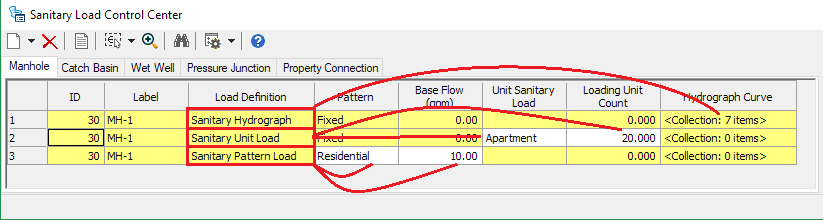
In the Control Centers, each row represents a certain type of load or inflow. So, only the fields for that respective type are available. In the below screenshot, you can see the fields available in the Sanitary Load Control Center for each type of load.
To delete a group of loads:
- Click on the row heading for the first load
- Hold <Shift>
- Click on the row heading for the bottom row
- Click the delete icon.
Note: You can also hold <Ctrl> to add rows to the selection, one at a time.
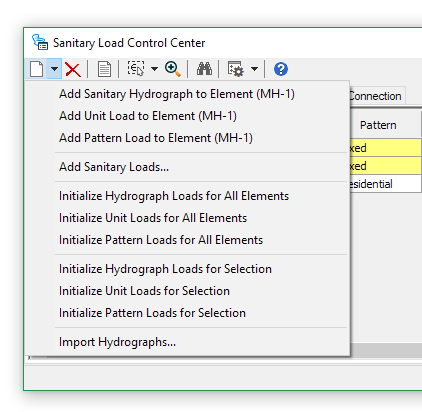
To add a load or inflow of a specific type, use the New button at the top-left corner and choose to:
- Add for the highlighted element - adds a load of the chosen type to the element whose existing load/inflow row you had clicked on before clicking the New button
- Add to a specified element - adds a load of the chosen type to a specified element, which may or may not already have existing loads/inflows
- Initialize for all elements - adds a load or inflow entry of the chosen type, for each node element (after which you can global edit or perform other operations as needed)
Assigning to Scenarios and Alternatives
Sanitary loading, including unit sanitary loads, are stored in the Sanitary Loading alternative. If you have sanitary loading that changes between scenarios, you will want to include an alternative for each of these scenarios. Sanitary loads and the multipliers for unit loads are stored in the Sanitary Loading alternative. So if you have a different load, unit load, or unit load multiplier for a given scenario, you would create a new alternative and assign this.
See Also
Filtering the Sanitary Load or Inflow Control Center by attribute or by selection set
Scenario and Alternative Management