| |
Applies To |
|
|
| |
Product(s): |
SewerGEMS, CivilStorm, StormCAD, SewerCAD |
|
| |
Version(s): |
CONNECT Edition, V8i |
|
| |
Area: |
Modeling |
|
| |
Original Author: |
Jesse Dringoli & Mark Pachlhofer, Bentley Technical Support Group |
|
Problem
How do I import catchment Subarea data from Excel or a CAD file? (This is used when the "Area Defined by" property is set to "Multiple Subareas".)
Solution
The process can be automated using the following steps.
*Note that this process assumes that the catchment elements are already in your model. If you have not yet imported them, either do this first using Modelbuilder, or import them at the same time that you import Subarea information. To import at the same time, you will need two tables in your Modelbuilder connection, one using the "Catchment" table type to import the catchments themselves, and another as per below for the Subareas.
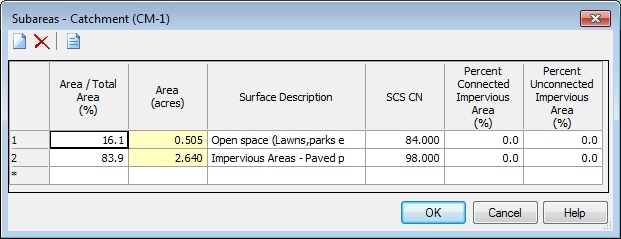
1 - If you already have the catchments in the model, your spreadsheet can be set up similar to this:

*Note that this assumes the use of the Rational or Modified Rational runoff method. If you're using the Unit Hydrograph Method, you'll have a column for the loss method (such as SCS CN) instead of the "Rational C" seen above.
2 - Open Modelbuilder (MB) (Tools > Modelbuilder) ) and create a new MB run by clicking the white paper looking icon at the top of the window.
3 - On the first step in MB select the data source type you're using from the drop down and then browse to the datasource to select it. For example, if using an Excel spreadsheet with a .XLXS format choose "Excel 2013/2010/2007 (12.0)" from the data source drop down and browse out to find the Excel sheet. Click the next button to move to step 2.
4 - In the step "Specify Spatial and Connectivity Options", the settings are not important since we are only updating the Subareas. If importing the catchment element in the same Modelbuilder connection, specify the coordinate unit of your data source. Click Next to move to the next step.
5 - In the "Specify element create/remove/update options" step, leave the defaults unless you'd like to choose your own options. Make sure the box is checked for "Update existing objects in destination if present in source". Click Next to move to the next step.
6 - In the step "Specify additional options", leave the defaults set for this step, but adjust them if necessary and click the Next button to move to the next step.
7 - In the Step "Specify Field Mappings", set the 'Table Type' to "Catchment, Subareas", the 'Key Fields' to "Catchment Label" (This field name may differ depending on what you titled it in your Excel sheet), and the "Sort By Field " to 'Auto'. See the screen shot below. This is the step where you'll also match or map the fields from your Excel sheet to the properties in SewerGEMS as shown in the scree shot below. In this case the labels on the Excel sheet that were used were the same or similar to the properties they were to be matched with in SewerGEMS. After you're done with this click the Next button.

Note: If the catchments in your model currently have the property for "Area Defined By" set to "Single Area" you'll need to either global edit that to "Multiple Subareas" in the catchment flextable or set up a second worksheet in your spreadsheet with columns for "Catchment Label" and "Area defined by", with "Multiple Subareas" as the chosen value for each cell. The "catchment" table type can be used in Modelbuilder to update that if needed.
8 - When asked if you'd like to build the model on step 6 choose 'Yes' and click the 'Finish' button.
Syncing information out (exporting) to a spreadsheet
If you need to sync information out to the spreadsheet to update the information automatically follow these steps.
Note: if you'd like to export subarea information to a spreadsheet for example for reporting purposes, you can configure a spreadsheet with the same columns seen in step 1 above, follow all the subsequent steps, but choose "No" in step 8, then use the below steps to export the subarea information to the spreadsheet.
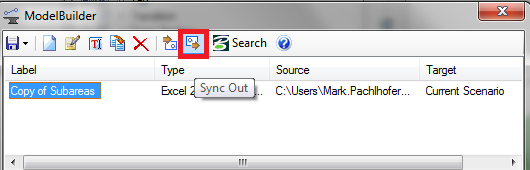
a - Choose the spreadsheet in ModelBuilder by highlighting the name in the ModelBuilder manager
b - Click the "Sync Out" icon to sync the information out to the spreadsheet
See Also
Using ModelBuilder to import external data