| |
Product(s): |
SewerGEMS, SewerCAD, StormCAD, CivilStorm, WaterGEMS, WaterCAD, HAMMER |
|
| |
Version(s): |
08.11.XX.XX and later |
|
| |
Area: |
Modeling |
|
Problem
What options are there for creating and viewing profiles? Can the software create profiles (Long sections) automatically for all the branches in the model towards the outfall?
Solution - Creating
Profiles can be generated in the below ways:
- Select in drawing with waypoints: Go to View > Profiles > New > Select the desired elements in the drawing. You can select each element, or waypoints. For example select the first and last node and a profile will be drawn between the element
- Right click on an element
- SewerGEMS/CivilStorm/StormCAD/SewerCAD: right click on an upstream element and choose Create Profile. This will create a profile from that element to the downstream outfall.
- WaterCAD/WaterGEMS/HAMMER: right clicking on a single pipe will give you the option to create profile, which creates a profile just for that pipe.
- Choose the start and stop nodes: click the node that you want to be at the start of your profile, hold down the CTRL key on your keyboard, then click the node that you want to be on the opposite (stop) end of the profile (so that both elements are selected in the drawing), then right click in the drawing and choose "Create Profile". This will create a profile of the shortest path between those two elements, if possible.
- Auto-create profiles: SewerGEMS, CivilStorm, StormCAD and SewerCAD have a feature to auto-create profiles for multiple branches:
- Go to View > Profiles > New > Auto Create profiles
- Select the element or outfall which you want to consider for auto creating the profiles, in “Network to profile” field.
- Select the direction; from up to down or from down to up, then click OK.
- This will automatically generate the profiles for all the branches in the model contributing to that element.
Viewing Profiles
Storm and Sewer products
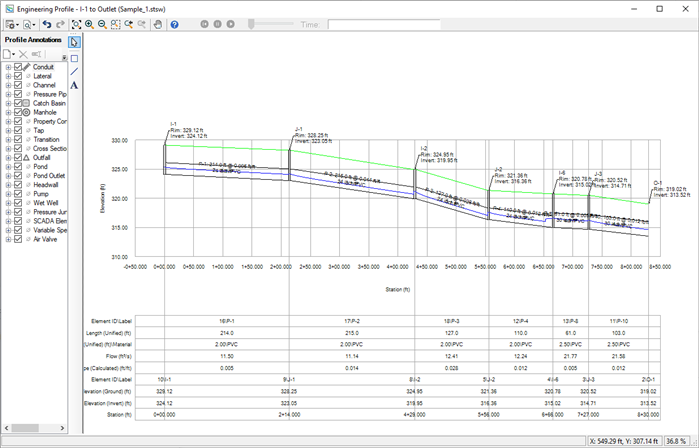
In the Storm and Sewer products, there are two different styles of profile: "Standard" and "Engineering". The "standard" profiles appear when double clicking the profile in the Profiles manager, and are best suited for viewing the model and quickly viewing it during model creation. The "Engineering" profiles can be access from right clicking on the profile name and choosing "Engineering Profile", and are best suited for presenting results, as you can customize it including annotations.
For time-variant simulations (such as with the Implicit or Explicit solver in SewerGEMS or an EPS with SewerCAD), the time slider bar at the top can be used to change time. By default you will see the profile view at time zero. As of October 2019, a button to jump to the time-of-peak HGL is not available but will be considered for a future release (reference # 1061108)

Profile Annotation Tables - both standard and engineering style profiles have the ability to display an annotation table below the profile. This can be used to display details such as the station (cumulative length), input fields and results. To view the annotation table, click the Tools button in the upper-left corner of the profile and choose "show profile annotation table". See more here: Ability to customize profile annotation tables
Standard Profile:

Engineering Profile:

Engineering Profile with Annotation Table and Results:
Water Products
For WaterGEMS and WaterCAD, profiling is typically not as important, so only the "standard" profiles are available (View > Profiles), which simply plot the physical elevation and an attribute such as Hydraulic Grade:
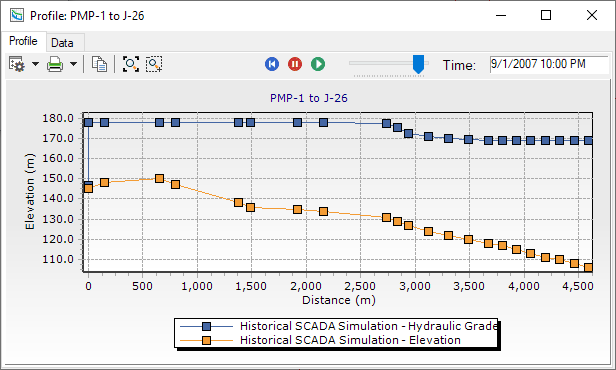
Note that a WaterGEMS model contains only one elevation, stored in the nodes. This could either represent ground elevation or actual pipe elevation.
This highlights one of the reasons why WaterGEMS and WaterCAD currently do not have the same profiling capabilities as the Storm, Sewer and Civil Design products (engineering profiles for example). Hydraulic models in WaterGEMS and WaterCAD typically don't need additional physical details such as inverts of all devices, etc in order to provide typical required results like flow and pressure. They also typically don't require elevations to be as accurate since the results that are typically of interest have a larger tolerance to elevations when compared to storm and sewer systems. Therefore since they don't have this information, since the elevations typically aren't as accurate, and since pipes operate under pressure whereby the pipe slope isn't a concern, users often do not look for detailed profiling (longitudinal sectional) and physical modeling.
Zoom in and out of profiles
When you zoom into a profile to closely observe elements, rather than clicking on "zoom extents" to zoom out of profiles you can just click from right to left.
Meaning, once you are active in the zoom window, click from the left side and drag to the right to zoom into particular elements / area. You can then click and drag from right to left to zoom out. So, rather than clicking on zoom extents each time you can click from right to left when you are zoomed in and again zoom in to another desired location.
This applies to both water and storm-sewer products.
Exporting Profiles (Storm and Sewer products only)
Individual Profiles
Individual profiles can be exported to a few different formats, for example to open in other applications or include in reports. First, both the standard and Engineering style profiles have an option to export to DXF format, from the options icon in the upper-left corner.
Second, the standard profiles (the one that appears when double clicking the profile name in the Profile Manager) have a few other options to export to, from the Chart Options dialog accessible by right clicking in the profile and choosing Chart Options.

List of Profiles
If you have a need to export or report on the list of profile names as seen in the Profile Manager, first consider if the branch labeling tool (Tools > Tools > More > Branch Labeling) and/or Sort Dendritic option (Flextable > Right click column header > Sort Dendritric). This enables you to label elements based on their network branches, and sort the flextable based on it as well. See more: Sorting and relabeling a flextable
If you still need to export a list of profile names - although it is not supported, you could try using a SQLITE database viewer such as "SQLIte Expert Personal" to open the model's SQLITE database and retrieve the names from the HMIModelingElement table (SQL statement: SELECT Label FROM HMIModelingElement WHERE ElementType=10) Or, consider taking a screenshot of the list from the Profile manager and include that in your report.
Multiple Profiles
If you have a need to print/export the profile view of multiple profiles (for example for printing purposes), it must be done one-by-one (DXF or image). As of January 2023, a batch export ability is not yet available, but will be considered by product management for a future release via Enhancement #1062672. In the meantime, the latest versions of these products can include profiles in the Custom Reports feature, so the solution is to add multiple profiles in a Custom Report.
See Also
Exporting profiles to .DXF files
How can I see the existing ground profile in the Engineering Profile View?