| |
Applies To |
|
|
| |
Product(s): |
PondPack, SewerGEMS, CivilStorm |
|
| |
Version(s): |
V8i, CONNECT Edition |
|
| |
Area: |
Modeling |
|
Overview
The format of storage chamber specifications may differ depending on the manufacturer. This article explains the format that PondPack, SewerGEMS and CivilStorm expect and how to properly enter your storage chamber information.
Entering Storage Chamber Information
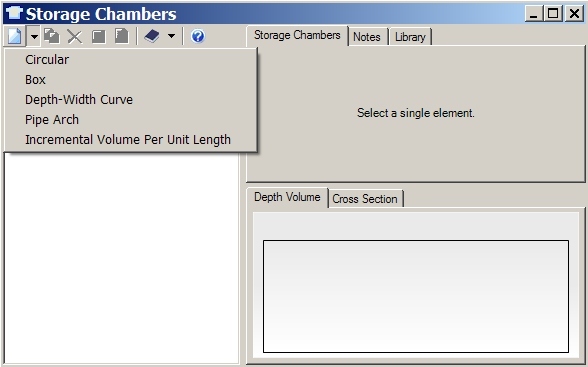
When modeling an underground storage chamber for detention in PondPack, there are five available section types: Circular, Box, Pipe Arch, Depth-Width curve and Incremental volume per unit length. These are defined in the Storage Chamber manager, under Components > Storage Chambers:
If you use a circular, box, or pipe-arch shape, you will need to fill in the dimensions of the storage chamber, such as diameter (for circular shapes), rise/span (for box), or various lengths and radii (pipe-arch). You can refer to the conduit shape topics in the Help documentation on these various shapes for details on these parameters.
In many cases, your storage chamber will not exactly conform to a circular, box or pipe-arch shape, and the manufacturer may give specifications on the chamber in terms of a depth-cumulative storage table. Consider the following example manufacturer data:
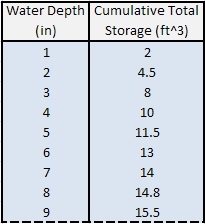
First, it is important to note that the volume information entered in the Storage Chamber manager is for the chamber volume itself, not including additional storage from the surrounding fill. The manufacturer may provide volume information for the "full" or "total system" storage, including the storage provided by the surrounding fill. In PondPack, the fill is accounted for outside of the storage chamber manager (see further below.)
In the above example case, let's assume that the given table is for the chamber only, which is what PondPack requires. Let's also assume that the table is for the whole storage chamber and that the chamber is 8 feet long.
With this information, the best way to define the storage chamber in PondPack is to use the "Incremental Volume Per Unit Length" storage chamber type. This is selected by clicking the New button and choosing "incremental volume per unit length". You must then enter a table of depth versus incremental volume per unit length, whose unit is cubic feet per foot or cubic meter per meter. You must then enter the "Effective length" of the chamber, which is how long a single storage chamber is.

As you can see from the name and units, the table you enter represents the storage volume at each vertical increment (depth) of a one-foot section of the given chamber. This allows you to re-use the same table for a given cross sectional shape, for different total chamber lengths. PondPack simply multiplies the volumes by the "Effective length" to achieve the total storage for the entire chamber.
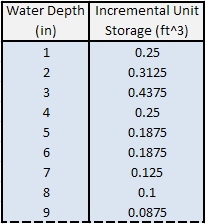
Furthermore, you can see that the table that PondPack requires is in incremental volumes. Meaning, the volume that you enter for each depth is the volume between that depth and the previous depth, not the cumulative volume.
Therefore in our example case, you can see that the given table cannot be directly entered, since:
- It represents the volume of the entire chamber, not just a one-foot section
- It is a table of cumulative volume versus depth, not incremental.
So, we must take the information from the manufacturer and modify it, given PondPack's required format. To change the volumes to represent a unit volume (one foot section), you would simply divide them by the total length. In this case, the chamber length is 8 feet, so you would divide each volume by 8 to get the unit volume:

Then, you would convert the table to show incremental volumes instead of cumulative, by subtracting the previous cumulative depth from the current cumulative depth:
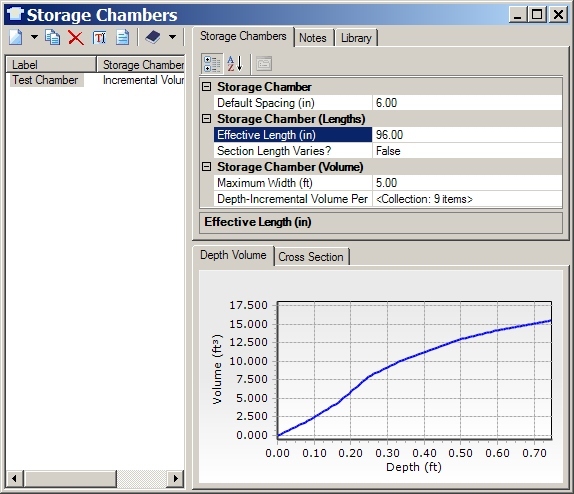
Now you're ready to enter the data. After adding a new Incremental Volume Per Unit Length chamber to the Storage Chamber dialog, click the "Depth-Incremental Volume per unit length" field on the right side and click the ellipsis button next to the "collection". This will open the Depth-Incremental Volume Per unit length table. You can either manually type in the values you computed, or you can copy/paste. To do this, highlight all the cells in your spreadsheet, press CTRL+C to copy, then click the first cell under the Depth column in PondPack and press CTRL+V to paste.

Note: make sure the correct units are used. For instance in the above example, depths are in inches. If the depth field in the table is not in the right unit, right click the column header, choose "units and formatting", then change the units accordingly.
Next, enter the effective length of a single chamber (8 feet in the example case) and the maximum width. The maximum width is needed because it cannot be derived from the depth-volume curve, but is important when considering the surrounding fill.
Setting Up a Storage Chamber System in the Model
Now, in order to use the storage chamber in the model and configure the surrounding fill, you must select it in the properties of the pond. For the "Pond Type", choose "Storage Chamber System", then select the storage chamber that you created from the "Storage Chamber" field. Lastly, enter the parameters of the surrounding fill:

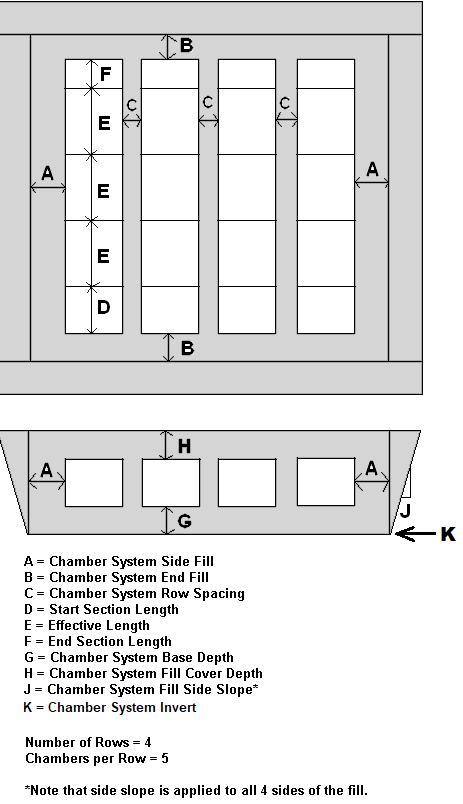
Chamber Header
If your storage chamber system has an additional "header" chamber/pipe which feeds inflow into the different chamber rows, you can account for it's additional storage by selecting "true" for "Chamber System Includes Header?". This is the red highlighted part in the below diagram. When electing to include a header (end cap)
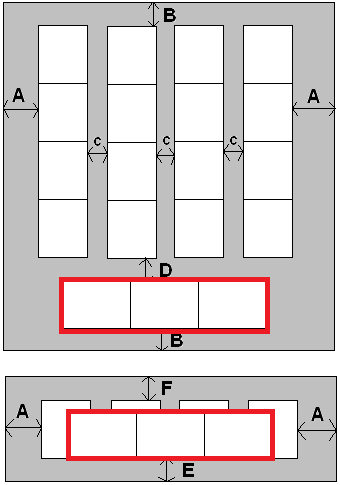
D - Chamber System Header Distance
B - Chamber System End Fill
E - Chamber System Fill Base Depth
Chamber End Caps
In some cases, a storage chamber manufacturer may separate the storage curves of the chamber pipes from the storage in the end caps (caps at the end of each chamber system row). As of April 2019, the storage chamber feature does not have a separate place to specify end caps. One of the following approaches could be adopted:
1) Use the header option to account for the caps. Meaning, select "true" for "Chamber System Includes Header?" and select the storage chamber library item representing the end cap storage, and use the "Chambers in header" to specify the number of end caps. You would then need to account for storage of any header pipe separately, for example by explicitly including them as an equivalently-sized conduit connected upstream of the pond.
2) Account for the end cap storage in the regular storage chamber library entries. However, since there is only one end cap per row, you would need to determine the appropriate amount by which to adjust the regular storage chamber's storage curves such that the total storage is accurate.
3) Neglect the storage of the end caps (typically they are relatively small) for conservative results.
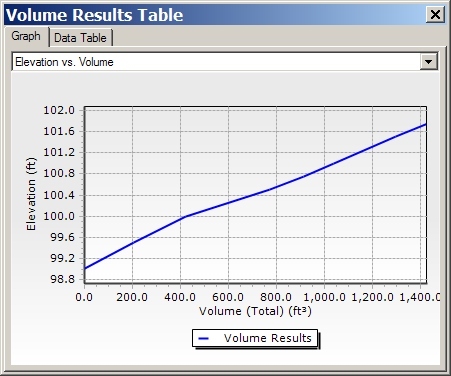
Calculated Elevation-Volume (stage-storage) Curve
The product takes all the information about the chamber(s), header and surrounding fill and constructs an elevation-volume curve to use during calculations. In PondPack, to see this curve, right click on the pond element and choose "Pond Volume Results Table". As of April, 2019, this feature is not currently available in CivilStorm or SewerGEMS.
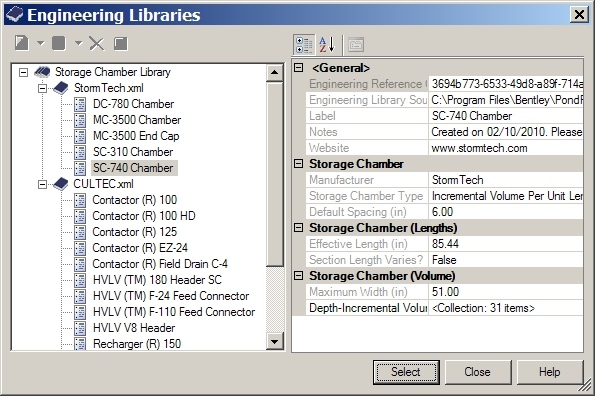
CULTEC and StormTech Chambers
If you'd like to use a storage chamber from CULTEC or StormTech, storage chamber library files are available. For most recent versions, these are included already. For older versions, these can both be downloaded from selectservices.bentley.com. (note: a CULTEC update from May 2015 is available here)
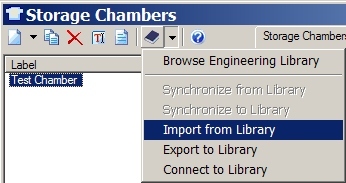
The CULTEC.xml and StormTech.xml files can be added to PondPack (or versions of SewerGEMS and CivilStorm that support storage chambers) under Components > Engineering Libraries. Right click "Storage Chamber Library", choose "Add existing library..." and select the .xml file. To import these storage chambers in the storage chamber manager, click the purple engineering library book, choose "import from library", select the storage chamber, then click "select". You'll now be able to use the storage chamber in your model.
Note: recent versions of SewerGEMS and CivilStorm include the StormTech, CULTEC and Brentwood libraries.
Note: Even if there is a slope to the storage chamber, the hydraulic grade from one end of the pipe storage to the other will not change. This is because the pond element, including for pipe storage or storage chambers, does not account for resistance from the sides of the pipes. For this reason, there is no hydraulic gradient to show, just the single water surface elevation over time. If you need to account for the slope of the HGL (hydraulic gradient) across the pipes, you would need to model this explicitly as conduit elements in CivilStorm or SewerGEMS, whose dynamic solvers do account for both the storage effects and the hydraulic resistance, and can generate profiles.
See Also
Pond and pond outlet assumptions in StormCAD, SewerGEMS, CivilStorm and SewerCAD