| Product(s): |
WaterSight |
| Version(s): |
10.00. |
| Area: |
Documentation |
Overview
Administration page used to configure style configurations. This page can be accessed by going to the administration > Numerical Models > edit and existent model > Manage Style Configuration.
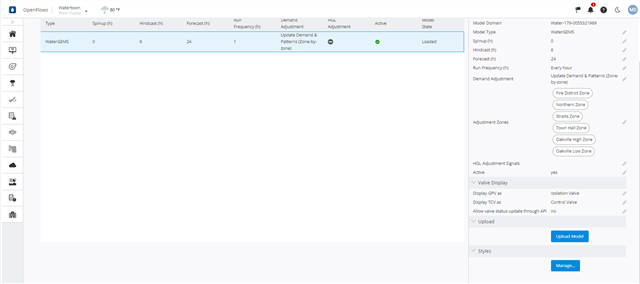
Style configurations define how a given element type (pipe or junction) is to be rendered in the results map. The style configuration defines both the color and size configuration for that element type. The configurations defined on this page will be available from the Model Symbology >> Under Pipes and Junction, on the Current Simulation page and in the Operational Response pages. The selected configurations will be applied, and the pipes and nodes will by styled accordingly. Every numerical model comes with a predefined set of "default" style configurations. Default configurations can be edited, but not deleted. Besides this the user can add more style configurations to be displayed on the pipes and junctions.
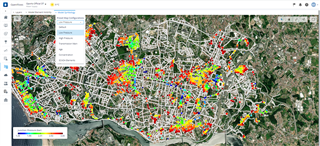
Figure 1 - Low pressure view
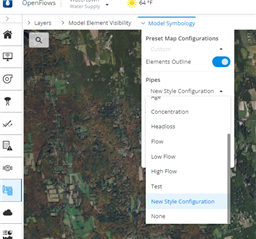
Figure 2 - New style configuration added by the user, is available in the pipes dropdown in the model pages.
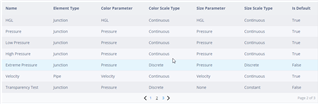
The style configurations are managed with the controls above the table. These controls allow for adding a new configuration, editing a configuration, and deleting a configuration.
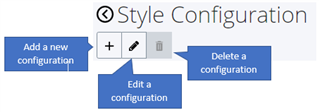
Note: The Delete button will be disabled for default configurations, as shown above.
Style Configuration Table
| Column |
Description |
| Name |
The name which will be displayed in the application. This field cannot be empty. |
| Element Type |
The type of element to which the configured style is applied. This can be a Pipe or Junction.
|
| Color Parameter |
The computed (or static) result value used to determine the element color. For Pipes, this includes computed results like flow and headloss gradient, as well as static result values like diameter. For Nodes, this includes computed results like pressure and HGL, as well as static result values like elevation. |
| Color Scale Type |
The type of scale used for mapping the result values to the corresponding color. The scale types include Constant, Discrete, and Continuous. |
| Size Parameter |
The computed (or static) result value used to determine the element size. For Pipes, this includes computed results like flow and headloss gradient, as well as static result values like diameter. For Nodes, this includes computed results like pressure and HGL, as well as static result values like elevation.
|
| Size Scale Type |
The type of scale used for mapping the result values to the corresponding size. The scale types include Constant, Discrete, and Continuous. |
| Is Default |
Whether or not the style configuration is one of the predefined default configurations. |
Edit Section
The edit section is where the selected style configuration can be updated. To edit a configuration, click on the desired configuration's row in the table, and then click the Edit button in the table controls. After this, the edit section will be active. To persist any changes made, click the 'Save Changes' button. This button will be disabled if there is an error in your configuration. To exit edit mode, click 'Cancel'. Here, the configuration Name and Element Type can be set:
The Color and Size tab are used to switch back and for between the color and size configurations for the active style.
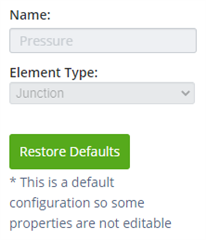
For default configurations, there will be a 'Restore Defaults' button. When clicked, this will replace whatever changes you've made to the configuration with the original settings.
Color Configuration
The 'Scale Type' dropdown at the top of the color configuration is used for determining what the Color Scale Type is. The options for the scale type are Constant, Discrete, and Continuous. The 'Parameter' dropdown sets the Color Parameter property on the style configuration.
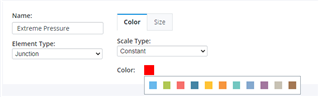
Constant Color Scale
A constant color scale will make all of the elements of the selected element type a single color. That color can be selected by clicking on the color picker:
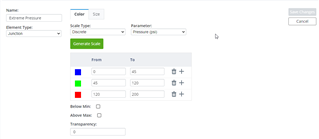
Discrete Color Scale
A discrete color scale is defined by a set of ranges, and the color to be applied to values within that range. All elements with parameter values greater than than or equal to the 'From' value and all values less than the 'To' value will receive the selected color. Ranges cannot overlap and the 'From' value must be strictly less than the 'To' value. To change the color, click on the color picker. To add a new range after a given range, click on the plus button. To delete a range, click on the trash button.
When checked, the 'Below Min." and "Above Max." checkboxes will apply the selected color to values that fall below/above the min/max values defined by all of the ranges. When not checked, any element with a parameter value below the minimum or above the maximum will not appear in the map. Additionally, any element with a parameter value that is not included in any of the ranges defined in the table will not be visible in the map.
The 'Transparency' value will set the transparency of all of the elements in the map. A transparency of 0 will make all of the elements fully opaque, and a value of 255 will make all of the elements fully transparent. Any value outside of this range is invalid.
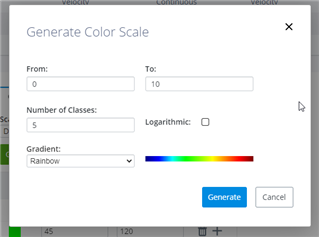
The 'Generate Scale' allows for quick generation of a set of ranges. The 'From' and 'To' values define the extents of the ranges, and 'Number of Classes' defines how many ranges should be created. If the Logarithmic checkbox is checked, the 'From' and 'To' values of the generated range will be determined by scaling between the 'From' and 'To' extents logarithmically, otherwise, equal-size ranges will be created. The 'Gradient' determines the color spectrum to which range values will be mapped.
Continuous Color Scale
A continuous color scale will map all of the values between 'Min. Value' and 'Max. Value' to the selected 'Gradient'. If the 'Logarithmic' box is checked, it will scale logarithmically between the min and max when mapping to the color gradient, otherwise it will scale linearly.
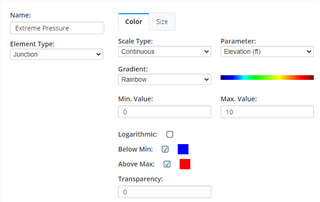
When checked, the 'Below Min." and "Above Max." checkboxes will apply the selected color to values that fall below/above the min/max values defined by all of the ranges. When not checked, any element with a parameter value below the minimum or above the maximum will not appear in the map.
The 'Transparency' value will set the transparency of all of the elements in the map. A transparency of 0 will make all of the elements fully opaque, and a value of 255 will make all of the elements fully transparent. Any value outside of this range is invalid.
Size Configuration
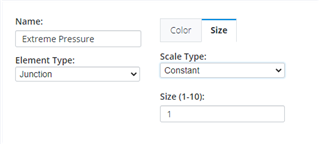
The 'Scale Type' dropdown at the top of the size configuration is used for determining what the Size Scale Type is. The options for the scale type are Constant, Discrete, and Continuous. The 'Parameter' dropdown sets the Size Parameter property on the style configuration.
Constant Size Scale
A constant size scale will make all of the elements of the selected element type the same size. The size is controlled by the 'Size' input, where accepted values range from 1 (smallest) to 10 (largest).
Discrete Size Scale
A discrete size scale is defined by a set of ranges, and the size to be applied to values within that range. All elements with parameter values greater than than or equal to the 'From' value and all values less than the 'To' value will receive the selected size. Ranges cannot overlap and the 'From' value must be strictly less than the 'To' value. To add a new range after a given range, click on the plus button. To delete a range, click on the trash button.

When checked, the 'Below Min." and "Above Max." checkboxes will apply the selected size to values that fall below/above the min/max values defined by all of the ranges. When not checked, any element with a parameter value below the minimum or above the maximum will not appear in the map. Additionally, any element with a parameter value that is not included in any of the ranges defined in the table will not be visible in the map.
The 'Generate Scale' allows for quick generation of a set of ranges. The 'From' and 'To' values define the extents of the ranges, and 'Number of Classes' defines how many ranges should be created. If the Logarithmic checkbox is checked, the 'From' and 'To' values of the generated range will be determined by scaling between the 'From' and 'To' extents logarithmically, otherwise, equal-size ranges will be created. The 'Min. Size' and 'Max. Size' values define the size spectrum to which range values will be mapped.

Continuous Color Scale
A continuous size scale will map all of the values between 'Min. Value' and 'Max. Value' to the selected range defined by 'Min. Size' and 'Max. Size'. If the 'Logarithmic' box is checked, it will scale logarithmically between the min and max when mapping to the size range, otherwise it will scale linearly.
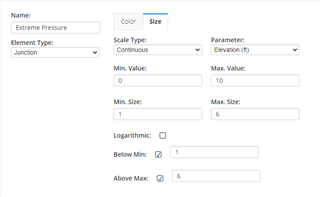
When checked, the 'Below Min." and "Above Max." checkboxes will apply the selected size to values that fall below/above the min/max values defined by all of the ranges. When not checked, any element with a parameter value below the minimum or above the maximum will not appear in the map.
For more information about WaterSight, please go to OpenFlows WaterSight TechNotes and FAQ's.