| Product(s): |
WaterGEMS |
| Version(s): |
CONNECT Edition, V8i |
| Area: |
Modeling |
Overview
The purpose of this TechNote is to discuss common steps to design new pipe layouts and pipe rehabilitation projects using Darwin Designer in Bentley WaterGEMS. Additional information can be found in the WaterGEMS Help menu. A free webinar demonstrating Designer is also available here:
Optimize Design and Rehabilitation with Darwin Designer
Background
Darwin Designer is an efficient method of designing new pipe layouts and pipe rehabilitation projects. It allows the user to design pipes for an existing model either manually or, with efficient genetic algorithms, in a more automated fashion. It allows for multiple design candidates to be presented so the best possible solution to a given system can be found. Solutions can also be exported into a new scenario for use in an existing water system.
Before considering Darwin Designer, first consider if it is the best method for your particular modeling situation. The way most engineers use modeling software is to pick diameters and simulate a wide variety of scenarios over the planning horizon. Then designs are checked against the applicable regulations in the engineer's area.
There are some situations where an optimization model like WaterGEMS' Darwin Designer can help but that needs to be for cases where the assumptions in the optimization exactly fit your design problem. Usually the best approach is to initially size the pipes by estimating the peak flow over the life of the pipe and a reasonable maximum velocity (e.g. 2 m/s) and solve A = Q/V. That will get you a good initial estimate. Then, run a large number of scenarios based on different future demand growth assumptions and emergency situations to see how these sizes will work.
Licensing
Darwin Designer is included with a license for WaterGEMS. Older licenses for WaterCAD allowed for the purchase of Darwin Designer as a separate add-on. This is no longer available but has been grandfathered in for these licenses. As of version 10.03.02.75, Darwin Designer is still available in the menu inside WaterCAD so that those who had purchased Designer separately in the past (and those who have Designer as part of also having WaterGEMS) are able to use it. If you only have a license for WaterCAD and had not purchased a separate Designer license in the past, you will only be able to perform Manual runs inside Darwin Designer (not optimized runs). You would need to upgrade to WaterGEMS (which can open WaterCAD models) to use optimized runs in Designer.
Note: for versions that use SELECTserver licensing (below version 10.02.XX.XX) Non-SELECT users will need to check out both WaterGEMS and Darwin Designer in order to use this tool. You can check out the license from the License management tool.
Getting Started
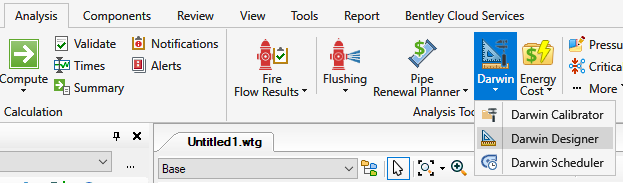
Darwin Designer is accessed by going to Analysis > Darwin > Darwin Designer (or in V8i and earlier, it is located under Analysis > Darwin Designer)
Once Darwin Designer is open, click the New icon in the upper left select “New Designer Study”. An item will appear in the window on the left, and a series of tabs will appear at the top right. Next, choose either “New Manual Run” or “New Optimized Run,” depending on the type of study you will be conducting. A new item will appear below the name of the design study. These can be renamed.

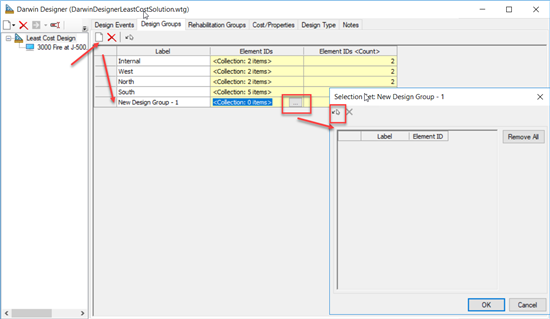
The next step is to create your demand or rehabilitation groups. As stated above, Darwin Designer can be used to design new pipes or rehabilitate existing pipes. By entering pipes or pipe groups into these tabs, the program will know what type of study is being done. In other words, new pipe design and existing pipe rehabilitation must be done in separate Designer studies, which are under separate tabs next to Design events.
It can be efficient to apply more than one pipe to a given design or rehabilitation group. Darwin Designer will assign the same diameter to each pipe in that group (or all of the pipes in the same rehabilitation group will receive the same rehab action).
NOTE: It would be better if you have less number of pipe groups in Darwin designer, as optimization takes a lot of computer time for generic algorithm, so more pipe groups, longer it takes to find a solution. You could also think about designing different parts of systems using different runs if you have a large system, using selection sets.
Those pipes should be combined together which are in series up to a point where there is major flow split, and from that point on, next pipes in another pipe group. For the purpose of grouping pipes together you should be familiar with the model, e.g. through multiple scenarios you will know how water moves at different times of the day, with multiple pumps running for different time steps. So you know which pipes are having major flow, which should be grouped together, then minor flow pipes in another pipe group and so on. Pipes having similar properties, should be grouped together so that they are designed with equal diameter, e.g. branch pipes should be in one group and trunk pipelines carrying larger flows should be included in another group.
The steps to add pipes to a new design or rehabilitation group are the same. First, click the New icon. A new pipe group label will appear. A collection field will appear under the column “Element IDs.” Click in this cell and then click the ellipsis (“…”) button. This will open a new dialog where you can select the elements to go into the group.
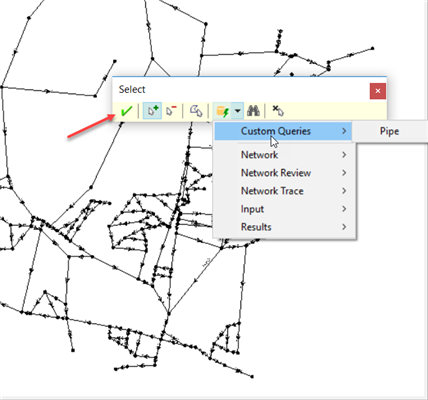
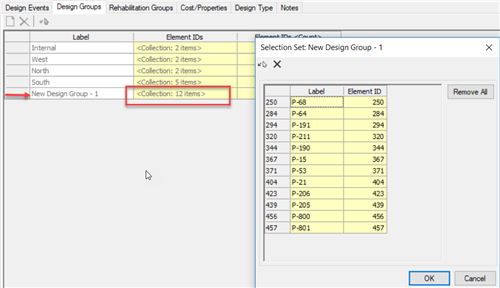
Choose the “Select from Drawing” icon to open the Select toolbar. You can add or remove elements by activating the Add or Remove icon (Add is active by default). You can also add elements by drawing a polygon around a given group, or using a query. Selecting by selection set is available under the Query selection as well. Once completed, click the green checkmark icon. You will return to the previous dialog. Click Ok to return to Darwin Designer. Note that the collection cell will say that items are now included.
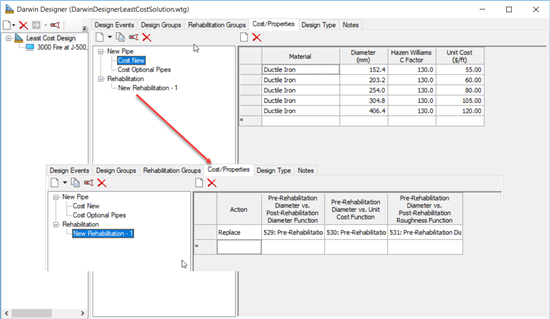
Next, go to the Cost/Property tab. Here you will enter the cost information for a given pipe size or rehabilitation action. To create a new item, choose the New icon and choose either “Design Option Groups” or “Rehabilitation Option Groups.” Next in the table on the right, begin to enter data. For Design Option Groups, enter the material, diameter, Hazen Williams C factor, and the Unit Cost. For Rehabilitation Option Groups, you will include an action, and then the diameter function, unit cost function, and roughness function for the pre- and post-rehabilitation scenarios.
Now go to the Design Type tab. Here you can select the Objective Type, and available budget for the project.

Now return to the Design Events tab. Choose the Representative Scenario from the pulldown. Darwin Designer will use data from the selected scenario when running the analysis. Next, select the New icon to create a new event. When you do this, you will see new information in the upper right of Designer dialog. Some of the fields will be unavailable to editing; this is pulled directly from the scenario assigned to the event. Items like minimum and maximum pressure and velocity will assure an efficient Designer run. Demand alternative will change as per the selected scenario for design.
If you would like to perform a design during peak demand conditions and you do not already have a scenario set up for this, you can use the "Demand Multiplier" column in the design events. So this will multiply the original demand by the demand multiplier value specified.
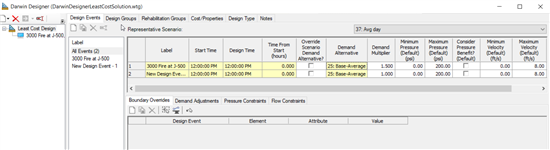
In the bottom right part of the Designer dialog, you can assign boundary overrides, demand adjustments, and pressure and flow constraints. These are used when the results calculated in the representative scenario might be different from when is observed in the field or allow a different set of constraints for certain elements.
Manual Design Run
Manual selections are used to force Darwin Designer to use specific designs in calculating costs of a new network design or existing rehabilitation study. The difference between the manual design run and the optimized design run is the Manual Selection column in the Design Groups and Rehabilitation Groups tabs. After you select a table to use for a group, you then set that group to use a specific pipe size or specific rehabilitation action.
Manual runs can be useful when you want to test hand calculations you have made or to reproduce an optimized design with some forced manual overrides for some pipes. You could also create a manual design run where you force the groups of pipes to specific sizes, since optimized design runs will choose the best fit.
To create a new manual design run, click the New icon and select “New Manual Design Run.” Go to the Design Group tab and select the Cost/Properties to be associated with the pipe group. Next, choose the size of pipe to be used for the manual run under the Manual Selection column. When you click the drop down, you will see a list of the pipe diameters assigned to the Cost/Property selection. It is possible to globally set the Cost/Properties column, but the Manual Selection column must to done individually.

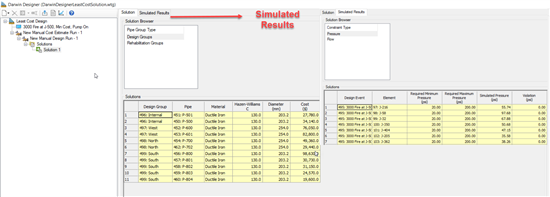
To compute, highlight the manual design run and click the Compute icon. After completion, a solutions will be available to view and export to the model.
To view the results, highlight Solutions. This will display the fitness and total cost for each solution. To see the results from individual solutions, choose one of the solutions from the list. You will be able to view the breakdown of costs and the simulated model results for the solution.
Optimized Design Run
The optimized design study uses a genetic algorithm to find the best possible solution available within certain parameters. The optimized design study has no true optimality and only knows the best solution relative to other solutions already found during computation. However, the optimized design study runs through a large number of possible solutions and can often find a very good solution to fit the model.
The process is similar to the manual run. Click the New icon in the upper left and choose New Optimized Design Run. Under the Design Group or Rehabilitation Group tab, choose the Cost/Properties field associated with the pipe group. You do not need to manually select the size since Darwin Designer will do that for you. Once completed, click the Compute button.
Darwin Designer will then try different pipe sizes or rehabilitation actions that fall within the constraints entered in the Design Event tab until the best solution is found based on the objective type. Darwin Designer will continue until it finds the best solution available. The results are viewed just as the manual run, however there is an option to view as many as ten solutions or more than that even. See the Tips section below for more information about this.

Updating the Model
If you are satisfied with the results, you can export the results to a new scenario, as well as new physical and active topology alternatives. To do this, highlight the solution you wish to export. The “Export to Scenario” icon will become active. Choose this icon and a new window will appear.

To export to a new scenario, check the “Export to Scenario?” box. Do the same for the alternatives. With the check boxes selected the new results will be exported to new physical or active topology alternatives. If you export to a scenario and do not export to an alternative (by unchecking the associated box or boxes), the data for that alternative type will be exported to the Base alternative.
Note: The data in your original model will not change unless you use this export feature. After exporting this data, it will create new separate scenario.
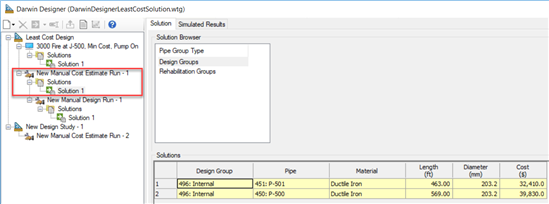
Manual Cost Estimating
Manual Cost Estimating is a method of estimating the construction cost of piping. This feature is available in Darwin Designer even for WaterCAD V8i users with limited licensing features, such as no license for optimized or manual Designer runs.
After creating a new Designer study, go to the Cost/Properties tab. Select the New icon and choose “Design Option Groups.” Enter the material, Hazen Williams C factor, and unit cost for each diameter of pipe.
Next, go to the Design Group tab and click the New icon to create a new group. In the Element ID column, click the ellipsis button and choose the element or elements to be included. For Manual Cost Estimating, no information is needed in the tabs for Design Event, Rehabilitation Groups, or Design Type.
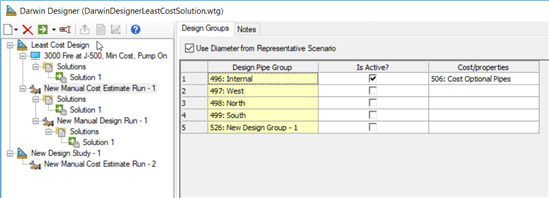
Next, click the New icon from above the left column and choose New Manual Cost Estimate Run. Highlight this run and click the “Is Active?” box for any pipe group you want included in the analysis. Choose the Design Option Group entered in the Cost/Properties tab in the Cost/Properties column. You can use the Global Edit feature to assign these. The other item to set up is the “Use Diameter from Representative Scenario” item. If this box is checked, this will assure that the costs are based on the diameter of the pipes in the scenario. If it is unchecked, you will need to manually enter the scenario to be used.
To compute the Manual Cost Estimating run, click the Compute icon. You will get a single solution. Highlight “Solutions” to get an overview of the total cost. Highlight “Solution 1” to view a breakdown on how the costs are distributed
Tips
After computing a designer study, you will sometimes see results that do not have a good fitness or do not make sense. Below are a few general tips to look at. More information on Darwin Designer can be found in the WaterGEMS Help documentation.
- Tips about how to create a pipe group, are explained at the starting of this technote under Getting started>NOTE section.
- If you are getting strange results, you can try the following:
- First, make sure you are using the correct design data, including the correct representative design scenario and that scenario includes all pipes to be sized by Darwin Designer.
- Second, make sure that the representative design scenario runs successfully within WaterGEMS. If it does not, then Designer will not be able to function correctly.
- Third, make sure that the correct demands are present. For EPS representative scenarios, make sure your patterns are correct and that you are using the correct time from start value in your design events.
- Fourth, make sure that you have applied the correct and necessary boundary conditions, including tank levels, pump operation, etc.
- Fifth, make sure that the range of pipe sizes and rehab actions you are using are reasonable and that you are allowing Darwin Designer a sufficient range of pipe diameters to come up with a reasonable design. Last, make sure that you have a reasonable number of design and/or rehab groups
- Since Darwin Designer applies a competent genetic algorithm to optimize the design, it does not require or have any domain-specific knowledge about the water system. This can have a side-effect for some design cases, like giving up-or-down pipe sizes. In particular, the solutions are evaluated by comparing the fitness values of solutions. Darwin Designer will assume a pipeline with pipe sizes that go up and down (to meet required pressures as closely as possible) is better than one that has a constant size that exceeds the pressures at some locations, since there is no specific penalty assigned to the fitness of a solution that has pipes that change up and down in size. It is up to you to control the eventual design and this can be done by different means.
- The first means is simply to make manual adjustments to a design after Darwin Designer has finished. Cleaning up a design may technically move you away from the cheapest design, but an inexpensive design that won't be constructed is of little use. You may find that not much cleaning up is necessary. Quick edits to diameters or rehab actions like can be performed effectively in Darwin Designer by using a manual design run.
- Another thing to consider when analyzing a Darwin Designer design is whether the chosen pipe sizes are a function of the lengths of pipe in your model. More information on this can be found in Help under the topic “Advanced Darwin Designer Tips.”
- Another means of achieving more constructible designs from Darwin Designer is to group in the same group pipes that would be constructed the same size. For example, a rising main would most likely be constructed a single size, and it would thus make sense to include all the model pipes that make up the rising main in the same design group. What you don't want to do by grouping pipes is artificially design the system even before you have had a chance to optimize it.
- When using the optimized designer run, you can change the results simply by changing some of the parameters under the Options tab. For instance, changing the Random Seed to another value will yield different results, possibly a solution that is better than the first pass through the simulation. You can also change items like the penalty factor, probability, population size, and maximum trials. More information on this can be found in Help under the topic “Advanced Darwin Designer Tips.”
- The number of solutions can be impacted by the setup of the model and other options. For instance, it is possible the only one or very few solutions will be found before the maximum number of generations or maximum number of trials is reached. Adjusting the values in the Options may yield further results. The design of the system and the pipes available for design can impact this as well.
- WaterGEMS also includes sample models and lesson files to help with the general setup of a Darwin Designer study. This is a good resource and can allow you to view completed models. The steps for the lesson files can be found in under File > Help > Quick Start Lessons. The lesson model files are found at the following file path:
"C:\Program Files (x86)\Bentley\WaterGEMS\Samples\Designer"
- If you are working in an isolated pressure zone where you have adequate suction and you haven’t selected the pump yet, you can replace the pump/pump station with a reservoir. The approximate HGL at the pump/pump station should be known and can be used for the reservoir elevation. Of course, any piping upstream of that points messed up if there are multiple zones upstream. Here you are assuming that the suction to the pump station is adequate. This is a quick way to get started on piping in an isolated zone if you are pumping from a tank this is adequate.
See Also
Genetic Algorithm Parameters in Darwin Designer
Can I use Darwin Designer for the EPS analysis?
Using the zero diameter option in Darwin Designer
Feasibility check failed. No feasible solution exists with current input data, for EPS analysis, with time from start >0.00 hrs.
Dimensionless vs. Unitized Benefit Type in Darwin Designer
Error running Darwin Designer - Value does not fall within the expected range