| |
Applies To |
|
|
| |
Product(s): |
WaterGEMS |
|
| |
Version(s): |
V8i, CONNECT Edition |
|
| |
Area: |
Modeling |
|
| |
Original Author: |
Akshaya Niraula, Bentley Technical Support Group |
|
SCADAConnect - Citect
One of the methods to bring SCADA data into a hydraulic model via SCADAConnect is by using a Citect Connection directly. To establish the connection and to import the data, there are a few specific steps in the Connection Manager and Data Source Manager of SCADAConnect.
Connection Manager (for Citect)
Information that needs to be entered in the Connection Manager will be different based on the location of the Citect Server hence the Connection Manager needs to be configured accordingly.
1) Within SCADAConnect, go to Tools > Connection Manager.
2) The Connection Manager opens.
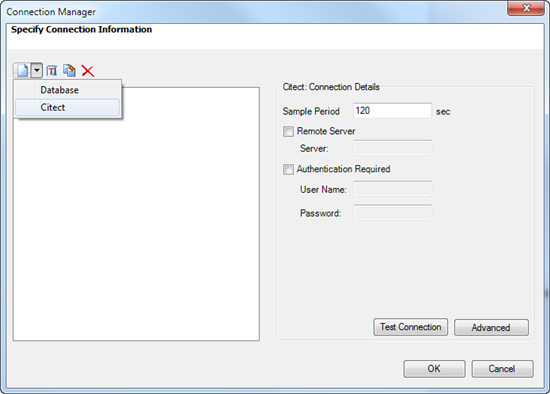
3) Click the New button and select Citect.
4) The Connection Manager screen will change as below.
Note
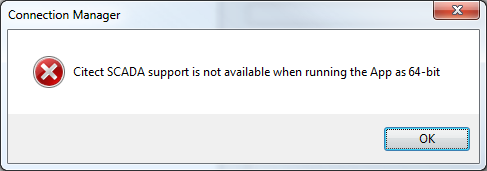
Citect version 7.2 through 7.4 (the supported versions) is not supported on 64 bit architecture so the following message may show up when clicking on Citect in the Connection Manager. You will need to open the 32 bit version of WaterGEMS/WaterCAD directly (from installed directory typically, \Program Files (x86)\Bentley\WaterGEMS (or WaterCAD).
Remote Server
In a condition where the Citect Server is located on the same machine where the hydraulic modeling software is installed, there is no need to enter the server name. So, leave the Server name field blank. However, the server name is required when the Citect Server is on some remote machine. So, put a check mark on Remote Server and enter the Server name. Typically, the server name is the same as the computer name of the remote computer.
Enable Legacy Connection
If the Citect server is on a remote machine and/or having some difficulty connecting to the server then certain information needs to be updated on the server side so that a remote computer can communicate with it. The following change is for Citect version 7.20. Any version lower than this, may not require the change.
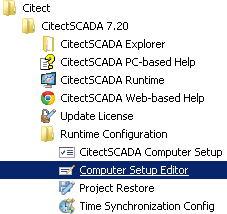
1) From Start > Programs > Citect > CitectSCADA 7.20 > Runtime Configuration
2) Click on Computer Setup Editor.
The following window will open
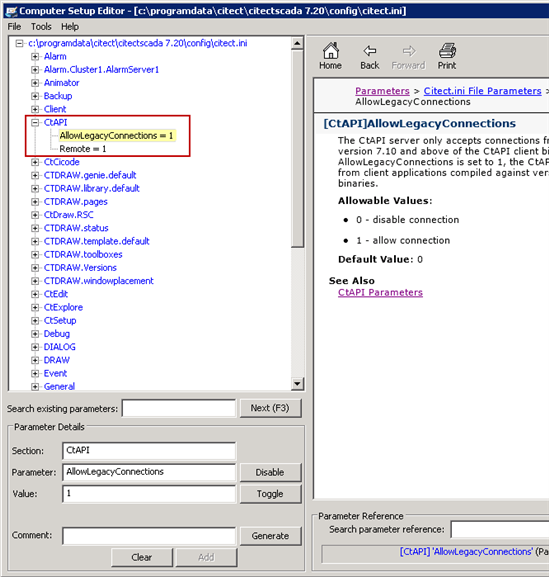
In this window, either create or update the CtAPI node and make sure it has the sub-items as shown.
CtAPI
AllowLegacyConnections = 1
Remote = 1
Save the settings file (File > Save on Computer Setup Editor) and exit out of the Computer Setup Editor window.
Authentication
Enter the User Name and Password used in the Citect Server in the Connection Manager window. (To add/edit users in Citect 7.20, Open Citect Explorer > My Projects > Project Name > System > Users)
Test Connection
After entering the server name (for remote Citect), User Name and Password, click on Test Connection. If you receive “Connection Unavailable”, follow the Citect Connection Troubleshooting steps. If everything is ok, a “Scada connection succeeded” message will be displayed.
Click OK on the Connection Manager to exit out of this window.
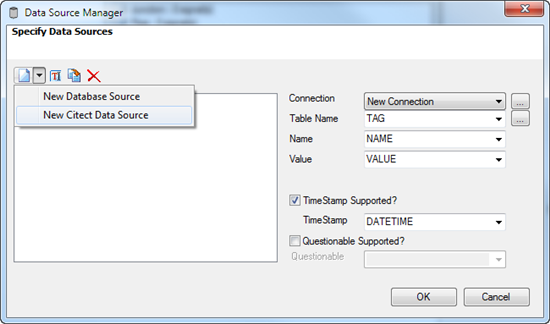
Data Source Manager (for Citect Source)
There is not a lot of change or user input needed in the Data Source Manager with a Citect Source. To create a new item for a Citect source, click on the New button dropdown, select New Citect Data Source and update the field as shown:
1) Connection: Select the connection created in the Connection Manager step from the dropdown.
2) Table Name: TAG
3) Name: NAME
4) Value: VALUE
5) Time Stamp: DATETIME
NOTE: as of SELECTseries 4 (08.11.04.57), the Table Name, Name, Value and TimeStamp fields are no longer available, as they are not necessary when using Citect. The only thing needed to configure a Citect source in the Data Source Manager is the name of the connection and whether it is historical or real time.
Click OK to exit out of the Data Source Manager.
The rest of the SCADAConnect related methods are the same as of the regular/database connection option. So, follow the instruction as described in the Help document.
Citect Connection Troubleshooting
1) Make sure the 32 bit version of the hydraulic modeling software (WaterGEMS/WaterCAD) is running. To check, go to Help menu > About and look at the lower left corner.

2) Make sure you are using a supported and tested version of Citect (7.2 through 7.4) and that you are not using a mix of DLL files from different Citect versions.
3) Make sure the necessary Citect dll files are copied to the correct location. On a 64 bit computer with WaterGEMS 32-bit, it would typically be, C:\Program Files (x86)\Bentley\WaterGEMS\. The necessary dlls can be copied from the Citect installed directory, typically
C:\Program Files (x86)\Citect\CitectSCADA 7.20\Bin\ .The files to copy are:
CiDebugHelp.dll
Ct_ipc.dll
CtApi.dll
CtEng32.dll
Ctg32.dll
CtRes32.DLL
CtUtil32.dll
Should there be any difficulty finding these files, please contact Bentley Technical Support team.
4) Make sure the Remote Citect (if connecting to a remote Citect Server) is reachable from the client machine. This can be done using the ‘ping remoteComputerNameHere’ command on the command prompt.
5) Make sure the User name and Password combination is valid.
6) Make sure Advance Logging is enabled and look at the log file. Contact Bentley Technical Support for help if needed.
7) Make sure that the latest patch has been applied. See: Cumulative patch sets for Hydraulics and Hydrology products