| |
Applies To |
|
|
| |
Product(s): |
SewerGEMS, SewerCAD, CivilStorm, StormCAD |
|
| |
Version(s): |
CONNECT Edition, V8i |
|
| |
Area: |
Output and Reporting |
|
| |
Original Author: |
Scott Kampa, Bentley Technical Support Group |
|
Problem
When printing a profile, there is a lot of white space around the profile. Is there a way to eliminate this?
Solution
Part of the reason for this is the scale involved with most profiles. They tend to be large in scale along the X-axis and small in scale along the Y-axis. Because of the way the print preview and printing options work, this scale needs to be maintained in the printed page. The common result is that the profiles tends to fill the page for the X-axis, but leave a lot of white space around the top and bottom of the profile.
A similar issue can occur when printing the drawing itself (see "See Also" link for details). However, the workaround provided there will not work for the profile. Instead, other options can be tried.
Option 1 - Change Aspect Ratio in Custom Reports
If you add your profile in a Custom Report, you can change the Aspect Ratio to adjust the shape of the profile, to better fit the page and to avoid the profile appearing "squished". For example you can try 4:2.
Option 2 - Export to DXF
After opening the profile, choose the Print Preview button, then choose "Fit to Page." This will open the preview window. First, try setting the Page Setup to view the profile in Landscape Mode. If that doesn't help, choose File > Export to DXF.
After creating this file, you can view in in Bentley MicroStation or AutoCAD. The appearance will generally be the same as the display in the Print Preview report, but you can use the presentation options in MicroStation or AutoCAD to help make the appearance when printed look better.
Option 3 - Use Engineering Profiles
In addition to the standard profile format, you can also view a profile as an Engineering Profile. To do this, go to View > Profiles. Right-click on the profile and choose "View Engineering Profile"
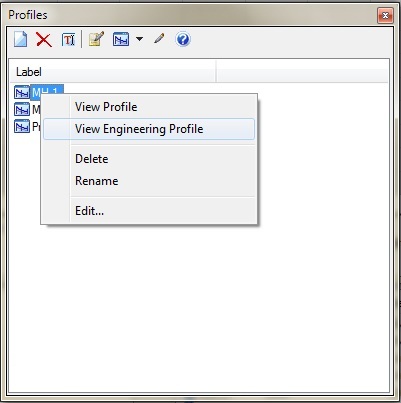
In the engineering profile, click the Tools button, choose Options, then change the scale appropriately so it fits better with your paper size.
Option 4 - Print from Chart Options menu
The Chart Options menu is an options settings dialog that can sometimes help with general appearance. Not all functions in the Chart Options are available, but the printing option does work.
To use this, open the profile. Next right-click on the profile and choose "Chart Options." A new dialog will open. At the top, choose Print.

In the Print menu, make sure that orientation is set to Landscape to maximize the paper space. Next, choose your printer.

As shown in the screenshot above, the appearance of the profile is more in line with the dimensions when viewing the profile on your workstation rather than in a report. There are no headers and footers, so if these are required they will need to be added later.
Note that there is no direct Print Preview option, however the printed page should generally look like the image in the Chart Options dialog. If available, you can print to PDF to make certain that the appearance is acceptable before printing a hard copy of the profile.
See Also
Using Fit to Page Printing in Standalone Platform