| Product(s): |
WaterGEMS, WaterCAD, Hammer, SewerCAD, StormCAD, SewerGEMS, CivilStorm, Pondpack |
| Version(s): |
CONNECT Edition, V8i or V8 XM |
| Area: |
Modeling |
Overview
The purpose of this TechNote is to briefly discuss the scenario management in the Bentley OpenFlows products. There are also Quick Start Lessons related to Scenario Management. These can be found by opening the product and going to File > Help > Quick Start Lessons.
Background
Scenario Management is one of many project tools available in the OpenFlows products. Scenarios allow the user to calculate multiple "What If?" situations in a single project file. The user can try several designs and compare the results, or analyze an existing system using several different input alternatives and compare the results.
A Scenario is a set of Alternatives and Calculation Options. Alternatives contain the actual model data. Calculation Options allows the user to run different types of analyses. The available items and properties listed for Alternatives and Calculation Options will vary from product to product.
Scenarios and alternatives are based on a parent-child relationship, where a child scenario or alternative inherits data from the parent scenario or alternative. This can be useful in situations where a new scenario will use most of the model data from an existing scenario, with only minimal changes to an alternative.
As noted above, different products will have different available alternatives. For simplicity, the screenshots below will show the alternatives list for WaterGEMS. The general steps involved will be the same across all products.

Video
Scenarios
A Scenario contains all the input data (in the form of Alternatives), calculation options, results, and notes associated with a set of calculations. Scenarios let you set up an unlimited number of "What If?" situations for your model and allow you to modify, compute, and review your system under different conditions.
This section will describe how to create new Scenarios, how to switch between existing scenarios, how to calculate a batch run, and how to compare results from different scenarios.
Scenario Manager

The Scenario Manager allows you to create, edit, and manage an unlimited number of scenarios. When opening a new project, there will be one default scenario, called “Base.” If you want to model different conditions in a system, whether it is modeling peak demands versus average demands or the current system layout versus a proposed future system layout, you can create additional scenarios that reference the alternatives needed to perform and recall the results of each of your calculations.
There are two types of scenarios: Base Scenarios and Child Scenarios.
Base Scenarios contain all of your working data. When you start a new project, you begin with a default base scenario. As you enter data and calculate your model, you are working with this default base scenario and the alternatives it references.
Child Scenarios inherit data from a base scenario or other child scenarios. Child scenarios allow you to freely change data for one or more elements in your system. Child scenarios can reflect some or all of the values contained in their parent. This is a very powerful tool, giving you the ability to make changes in a parent scenario that will trickle down through child scenarios, while also giving you the ability to override values for some or all of the elements in child scenarios.
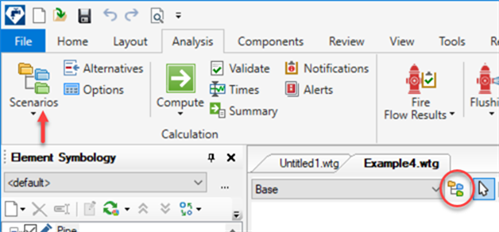
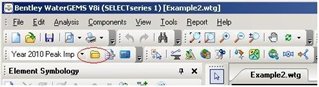
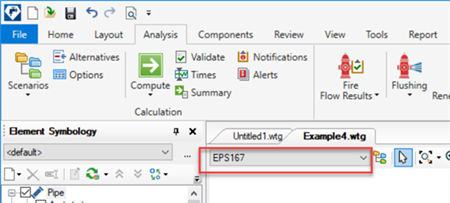
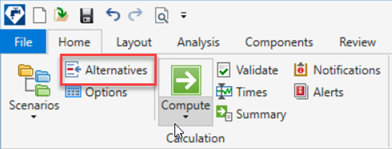
In CONNECT Edition, the Scenario Manager can be opened by going to Home > Scenarios or Analysis > Scenarios. In V8i and earlier, you would go to Analysis > Scenarios. You can also click the Scenario icon in the drawing pane. With the CONNECT Edition, the Ribbon interface has been introduced which looks like first screenshot below. For V8i OpenFlows product versions, interface is like second screenshot below.
CONNECT Edition:
V8i:
Creating New Scenarios
There are two methods to create a new scenario. First, you can select the New icon in the upper right and choose either Base or Child Scenario.

Second, you can right-click on any scenario listed in the Scenario Manager, select New, and choose either Base or Child Scenario.

Changing the Current Scenario
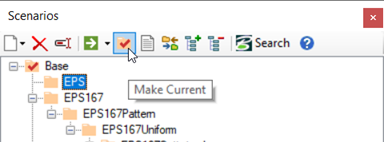
Once you have multiple scenarios, you will want to switch between them to view the properties and results in a given scenario. There are a few different ways of doing this. First, you can select the Make Current icon in the Scenario Manager. This will make the highlighted Scenario the active scenario.
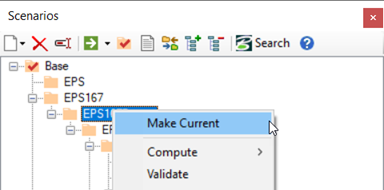
Second, you can right-click on any scenario and select Make Current.
Third, there is a way of changing the current scenario outside of the Scenario Manager. In the main drawing area, there is a pulldown menu listing the name of the current scenario. By clicking in this box, you will see a list of the available scenarios. Choosing a scenario from the list will set that scenario as current.
Note: In the old V8i versions, if the pulldown is not available it can be added. Right-click on the space around the other icons and select the Scenarios item. This will add the pulldown, as well as icon to open the Scenario Manager, Alternatives Manager, and Calculation Options Manager. In the connect edition versions, it is available by default.
Batch Run
You can compute your scenarios one at a time by making a scenario current and then computing the model. You can also compute more than one scenario consecutively by doing a Batch Run. As with many functions in Scenario Management, there are multiple ways of doing this. First, you can select the small triangle beside the Compute icon, then select Batch Run.
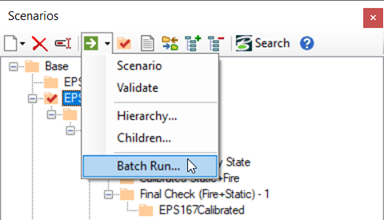
Second, you can right-click on any scenario, then select Compute, then Batch Run. Also if you click on the Search button, it will open up related topics on Communities and Forum topics related to scenario management.

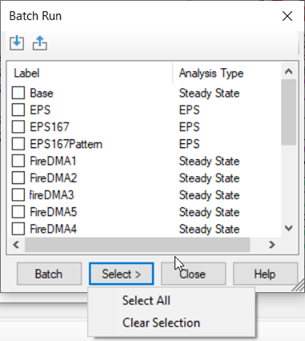
Either method will result in a new dialogue listing all available scenarios. Click the box beside the scenarios you wish to compute and then select Batch. Each selected scenario will then compute.
Note: Once multiple scenarios are computed, either manually or with a batch run, it is possible to compare results either by switch between scenarios (see “Changing the Current Scenario” above) or by graphing given elements in the model.
Note: Starting with the CONNECT Edition Update 2 releases of the products, a new import and export feature has been included in the Batch dialog. You can select a set of scenarios in a batch and export these selections out to a Scenario Batch Run (.sbr) file. If you clear the batch selection, you can then quickly select them again by importing the Scenario Batch Run file again. This can be particularly useful for models with a large number of scenarios, to enable you to switch between different batch runs quickly.
Scenario Properties
As stated above, scenarios are a compilation of alternatives and calculation options. Viewing, changing, and managing the different alternatives associated with a scenario is done through the Properties dialog. In order to view the scenario properties, double-click on the scenario. Alternatively, you can right-click on the scenario and choose Properties. In the property search you can quickly search for an alternative.

Displayed in the Properties dialog will be a list of the alternatives associated with the scenario. If you have created a new scenario, you will likely wish to change to an alternative that reflects the properties of the scenario. If you have created a new Base Scenario, all of the alternatives will default to the Base Alternatives. If you created a child scenario, the scenario will initially inherit all of the alternatives from the parent scenario.
When you create a child scenario, the scenario inherits the alternatives of the parent scenario. In these cases, you will see an "I" next to the name of the alternative. If you pick an alternative without the "I," then the child scenario will no longer inherit the changes in alternatives made in the parent scenario.
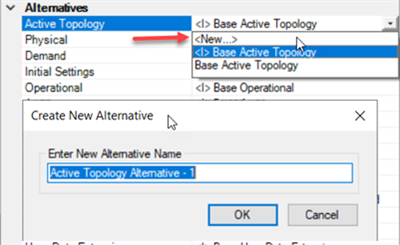
To change any alternative for a scenario, click the pulldown beside the alternative name and select the alternative.

If you have not yet created an alternative for the scenario, you can create a new alternative here as well. Select the item “New”. You will be prompted to enter the name for the new alternative. After entering the name, the new alternative will be selected for the scenario. The new alternative will now be available in the Alternatives manager as well.
New alternatives can also be created in the Alternatives manager. This will be documented below.
The Scenario properties is also where you can select a new Calculation Options for a given scenario. Similar to the alternatives, you would use the pulldown menu to select the calculation option. You can also create a new calculation option from these, just as you would an alternative. Any new calculation option created will be added to the Calculation Options manager. See the section on Calculation Options for details.
Alternatives
Where scenarios are a collection of alternatives and calculation options, an alternative is where the model data is collected. Each program as a listed of alternatives that it will use, though there are some common alternative types, such as the Active Topology alternative or the Physical alternative. Each alternative includes a set of data. As an example, the Physical alternative has all of the physical properties for the elements in the model, such as pipe diameter or node elevation, the Demand alternative in WaterGEMS and WaterCAD will contain all demand data, and so on.
Alternatives Manager
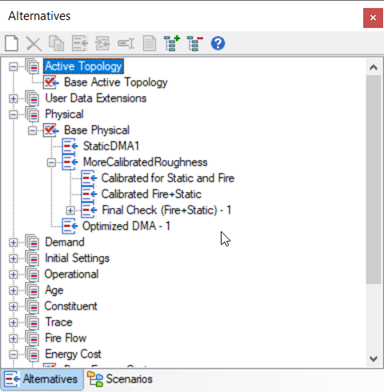
The Alternatives manager allows you to create, view, and edit the alternatives that make up the project scenarios. The Alternatives manager consists of a pane that displays folders for each of the alternative types, which can expand to display all of the alternatives for that particular alternative.
If you are unsure which alternative you need to work with for a particular change you want to make, open the Properties of the base alternatives and look for the field in question. Move to the next alternative until you see it. You can also open the Properties for a given element type. The Properties grid for an element to broken up into categories, like as Physical or Active Topology. This can give you a general idea of which alternative a given property is located.
The Alternative Manager can be opened by going to Home > Alternatives or Analysis > Alternatives. You can also click the Alternatives icon listed above the drawing pane in the V8i versions.
As with scenarios, there are two kinds of alternatives: Base alternatives and Child alternatives. Base alternatives contain local data for all elements in your system. Child alternatives inherit data from base or parent alternatives. The data within a child alternative consists of data inherited from its parent and the data altered specifically by you (local data).
Remember that all data inherited from the base alternative is changed when the base alternative changes. Only local data specific to a child alternative remain unchanged.
The asterisk "*" column in the alternative indicates whether or not the data in that alternative is inherited from the parent alternative. See: What is the asterisk "*" column mean in relation to alternatives?
If you need to change inheritance for a group of elements, right click one of the column headers in the alternative, choose Filter, set up the filter criteria, apply the filter, then right click on the '*' column header, choose Global Edit and turn it on or off for the group of elements, as needed.
If you have a selection set that is not based on a query (and so cannot use the filter function), consider creating a User Data Extension (UDX), filter the element type's flextable on selection set, global edit that UDX to some unique value, then you will be able to use the filter feature in the alternative to query based on that UDX field.
Steps to create new alternatives are the same as the steps to create new scenarios. See the section “Creating New Scenarios” above.
Many alternatives include tabs for different element types. This is so you can adjust the properties of different elements in a single alternative. For example, you can can a junction's emitter coefficient and a pump's pump definition in a given alternative. Having two alternatives, one for the emitter coefficient and one for the pump definition, is not needed if both changes are needed for a given modeling case.
Editing Alternatives
To edit an alternative, expand the tree so that all of the alternatives for a given category are listed. There are a number of ways to open an alternative. You can double-click on the alternative. You can also highlight the alternative and select the Open icon. Finally, you can right-click the alternative and select Open. This will open a new dialog window.
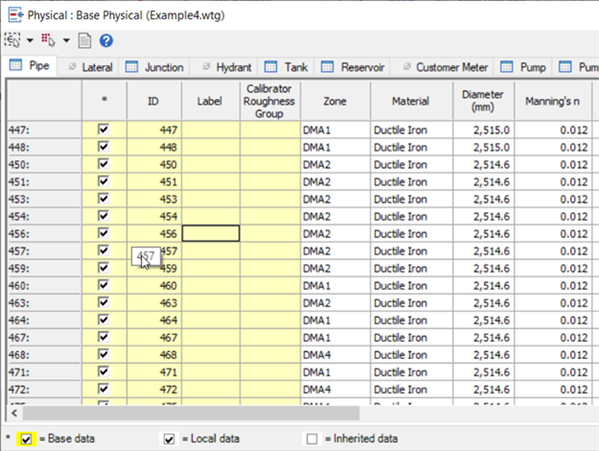
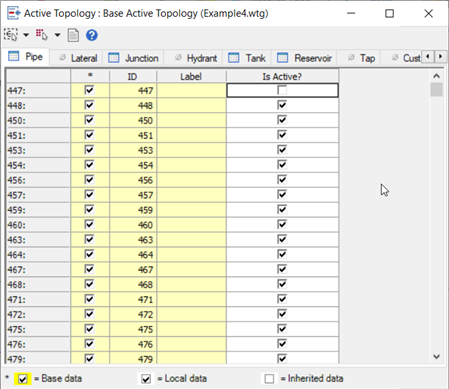
Each alternative will have different properties. Any column that is shown as white is an editable field. Columns in yellow are not editable from the alternative, but in some cases may be editable from other places in the model, such as the Flextables or Properties.
The first column in any alternative editor contains a series of check boxes, which indicate the records that have been changed in this alternative. If the box is checked, the record on that line has been modified and the data is local, or specific, to this alternative. If the box is not checked, it means that the record on that line is inherited from its higher-level parent alternative. Inherited records are dynamic. If the record is changed in the parent, the change is reflected in the child as well. The records on these rows reflect the corresponding values in the alternative's parent.
Information on the individual alternatives available in the different OpenFlows software can be found by searching the Help menu for the product.
Note: Changes to a model do not need to be done in the alternative. It is common to make adjustments to a model using the element Properties or element FlexTables. If you make a change in the model through the Properties or FlexTalbes, such as updated a node elevation, the alternative associated with the active scenario will also be updated.
Calculation Options
The Calculation Options Manager allows you to create, view, and edit the calculation options available for your scenarios. The dialog box consists of a pane that displays calculation options created. Calculation options can be accessed in CONNECT Edition through Home > Options or Analysis > Options. In V8i, you would go to Analysis > Calculation Options.

Note: The parent/child functionality is not used in for calculation options. New calculation options can be created by select the New icon.
In order to edit the calculation options in the manager, double-click on the one you want to edit. This will display the properties of the calculation options in the Properties dialog.
Properties contained in the calculation options will differ between different OpenFlows software. Information on what properties are available can be found by searching the Help menu for the product.
Deleting Scenarios and Alternatives
See also: Managing large number of scenarios
There may be a case when you would wish to delete some alternatives or scenarios. Some of these might be created accidentally as is the case with the "Design" calculation option of the GVF-Convex Solver of SewerCAD and SewerGEMS. When "Design" calculation option is selected in this case, the program by default asks if you wish to capture the changes in a separate alternative. The message would appear as such;
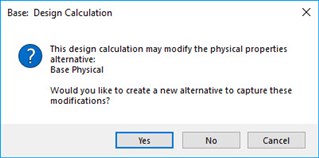
If "Yes" is selected, a new child alternative to the Base Physical alternative would be created. If "No" is selected, the changes resulting due to constraint based design would be captured in the Base Physical alternative itself.
In some cases, alternatives and scenarios are created for additional "What If?" situations which you may not wish to keep in your final model.
There is an enhancement filed for this feature (#680491) for cleaning up scenarios and alternatives for future release. However, you can delete individual alternatives. Care should be taken that they are not referenced to any scenario. When an alternative is referenced to a particular scenario, a small "red" check mark can be seen on the alternative hinting it is being currently accessed by the current scenario.
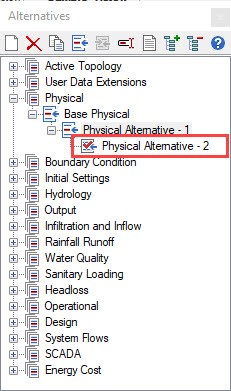
In the example above, you would not be able to delete "Physical Alternative -2" since it is still associated with the current scenario. Notice the small "red" check mark on it. To delete this you have to first change the physical alternative associated with the scenario.
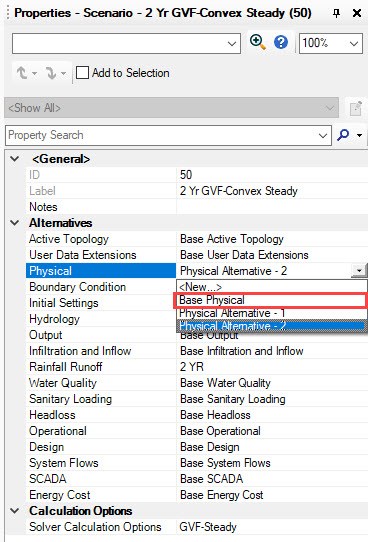
In the Scenario properties, change the Physical alternative to "Base Physical" (for example). Now the scenario is accessing this "Base Physical" alternative. It is also reflected in the tree structure of alternatives. The "red" check mark would now be visible on the "Base Physical" alternative.
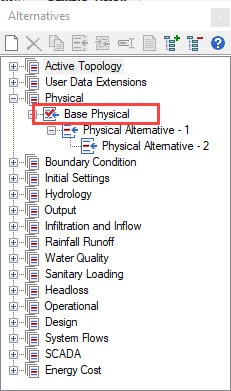
Now you can delete the Physical Alternative -2. It should also be kept in mind that inheritance also is important in such cases. Because "Physical Alternative -2" was a "Child" of the "Base Physical" alternative, it was possible to delete after the association with the current scenario was removed. The reverse is not possible i.e. one cannot delete the "Base" alternative or scenario if the "Child" alternatives or scenarios are existing.
Another approach to removing unwanted scenarios and alternatives is by merging them upwards i.e. converting child scenarios into base scenarios. More information on this can be found in the following wiki: Is it possible to make a child scenario/alternative into a base scenario/alternative?
Scenario Comparison
It is possible to compare two scenarios to see what alternatives and what properties associated with the alternative are different. The following links have details on the workflow:
Is it possible to compare scenarios and alternative between models?
Comparing results between scenarios
See Also
Using demand alternatives or calculation options to model different demand conditions
View Batch Run Results with Scenario Calculation Summary and Report Builder
Active Topology Management