Document Information
Product(s): OpenPlant PowerPID V8i
Version(s): SELECTseries 3+
The Plant Project Database Mapping Extension allows different operations with mappings such as Create, Edit, Remove, Copy and Paste. Below is detailed description of those operations.
Creation of a New Class Mapping
To create a new mapping select a non-mapped class in the class editor navigation tree and click "Edit" on the "Class Mapping" tab or right click on the class and select "Add Mapping..." from the context menu. The "Edit Class Mapping" dialog box is displayed.
Example: Map the EQUIPMENT class in from the Open Plant schema.
Defining Database
Select the database where the instances of the equipment class is stored. For our case this is PROJDATA.
Note: Mapping of a class or a relationship can only be associated with a single database. Classes spread over two or more databases are not supported.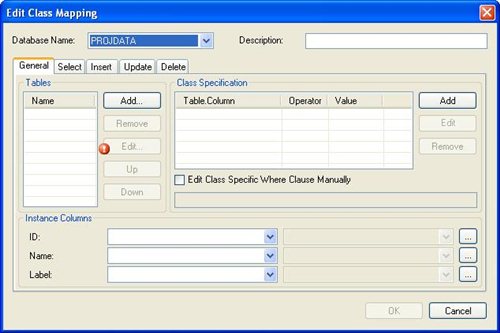
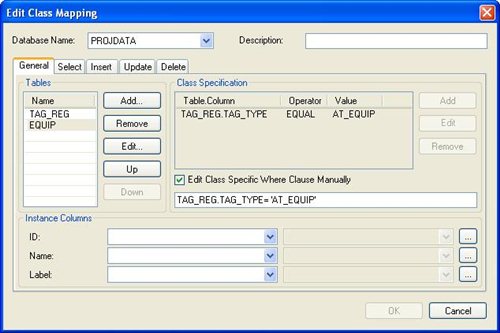
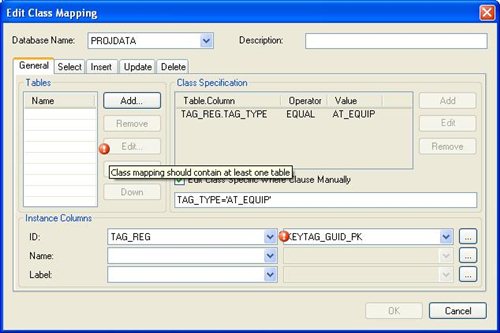
Class Tables
Add the tables where the instances of the class are stored. Press "Add..." and select a table, e.g. "TAG_REG". Then select the second table - "EQUIP".

Note: The data will be committed to the database according to the order of the tables in the list. To change the order use the "Up" or "Down" buttons.
Class Specification
The two tables actually contain objects of different classes. The classes are distinguished by values in a special column. We call the columns "Class Specification" columns. To add a class specification click the "Add" button. The class Specification Column dialog box is displayed. For the EQUIPMENT class specify the following fields and click OK:
- Table Name: TAG_REG
- Column Name: TAG_TYPE
- Comparison: EQUAL
- Value: AT_EQUIP

This specification actually means that only rows that have "AT_EQUIP" in the "TAG_REG.TAG_TYPE" column relate to an instance of the EQUIPMENT class. (This definition is converted to an SQL statement with a Where Clause by the Plant Project Database ECPlug-in.
The class specification can have several conditions. They are joined by the logical operation AND. Supported comparison operations are the following:
- EQUAL
- NOT_EQUAL
- IS_NULL
- IS_NOT_NULL
- LIKE
- ANY_OF
Alternatively this condition can be specified manually. For that check the "Edit Class Specific Where Clause Manually" option and specify the SQL Where Clause: "TAG_REG.TAG_TYPE= 'AT_EQUIP'"
InstanceID Mapping
Each instance in the Object model should have a unique InstanceID. This is necessary to map the InstanceID to a column in the database. Specify the table and the column where the InstanceID is stored . In case of the EQUIPMENT class this is TAG_REG.KEYTAG.

Optional you can map the Name and Label instead of the InstanceID
Joining Tables
If a class instance stored in two tables is necessary to define rules to join the tables (specify a Join Clause). For that select the "Select" tab in the Edit Class Mapping dialog box and click the "Add..." button. The Edit Join Clasue dialog box is displayed. Specify the columns by which the tables will be joined :
- Joined Table Name: EQUIP
- Joined Table Column Name: KEYTAG
- Main Table Name: TAG_REG
- Main Table Column Name: KEYTAG
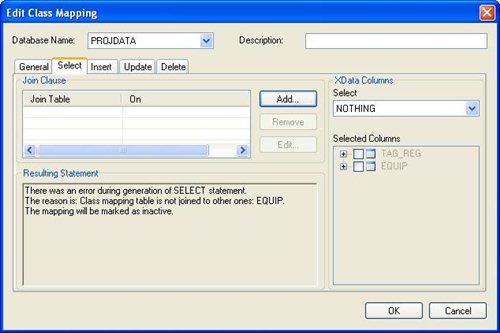

After specifying the join clause the first necessary steps to make class readable are finished. This is reflected by successfully generated select clause in the resulting Statement section.
Note: If class tables are joined by columns that don't contain any InstanceID the mapping will work only for reading, Update, Delete and Insert will not work.
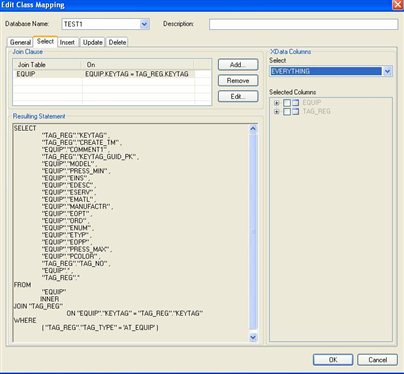
XData Columns
eXtendedData Columns are columns in the class tables that contain extended data that is not mapped or just needs to be stored for some purposes. The data is put in Instance.ExtendedData. Under "XData Columns" section it is possible to specify rules of selecting the data. There are several available possible options:
-
NOTHING - No extended data will be read
-
NOT_MAPPED_ONLY - Only those columns that are not mapped are put into Extended Data
-
EVERITHING - Put everything from class tables in extended data
-
SELCTEDONLY - Only selected columns will be read. The columns should be checked in the tree under "Selected Columns".
Note: XData is read only; at this time the Plant Project Database ECPlugin doesn't support writing of XData.
Insert options
The Plant Project Database Mapping Extension supports specifying special options which are necessary for the insertion of a new instance in the database. To do it select the "Insert" tab in Edit Class Mapping dialog box (see Fig.19). The Insert tab has three sections:
-
Primary Keys Generators
-
Obligatory To Be Set Columns
-
Resulting Statements
The Insert tab contains generated SQL statements for inserting instances based on TAG_TYPE in Project Database
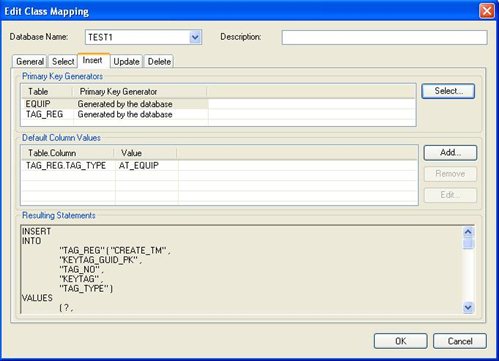
Primary Keys Generators
In the top section of the Insert tab the Primary Key Generators are defined. By default the generators are set to "Generated by the database". To change this options select table in list and click the "Select" button. IThe Edit dialog box is displayed. The following options are available:
-
Generated by the database - Database itself is intended to generate the Primary Key
-
Generated by the upper-layer plug-in - ECPlugin layered over SqlDb ECPlugin will generate the Primary Key.
-
Bentley.EC.SQLAdapter.NewGuidPKGenerator - Built-in custom generator; it generates a value as new GUID.
-
Bentley.EC.SQLAdapter.MaxPlusOnePKGenerator - Built-in custom generator. It gets the maximum value from the primary key column and defines the new value as max+1.

Custom Primary Keys Generators
"Bentley.EC.SQLAdapter.NewGuidPKGenerator" and "Bentley.EC.SQLAdapter.MaxPlusOnePKGenerator" are custom primary key generators that are built in the SqlDb ECPlugin's assembly (Bentley.EC.SQLAdapter.dll). To define your own custom generator it is necessary to implement an interface defined in Bentley.EC.SQLAdapter.dll:
Bentley.EC.SQLAdapter.IPrimaryKeyGenerator
The assembly with the class implementing the interface should be placed in to the same folder as Bentley.EC.SQLAdapter.dll. Usually this is the "Extensions" folder underneath the installation folder.
Obligatory Columns
While inserting new instance in the database the values of some columns should have a certain values to keep data integrity (e.g. The TAG_TYPE for equipment components should always be "AT_EQUIP"). These values are defined in the "Obligatory To Be Set Columns" section. The values can be added, modified and deleted. Click the "Add" button. The Column Obligatory To Be Set dialog box is displayed. Select the table, column and a value. For our example (EQUIPMENT) the obligatory column is TAG_TYPE. Enter the following values:
-
Table Name: TAG_REG
-
Column Name: TAG_TYPE
-
Value: AT_EQUIP

Update and Delete
At this time the Plant Project Database Mapping Extension has no specific options for Update and Delete. You can review the Update and Delete statements under the corresponding tabs.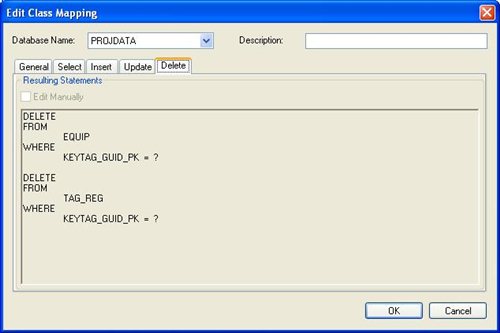

Edit Class Mapping
To Edit an existing class mapping select a class in the Class Editor and click the "Edit" button in the Class Mapping tab of Plant Project Database Mapping Extension. It is possible to change all options that were defined while creating the New Class Mapping (see Creation of New Class Mapping). A special error icon indicates an errors and gives an error description). For example:
Removing Class Mapping
To remove an existing class mapping right click on class and select "Remove Mapping..." from the context menu or press the "Remove" button in Class Mapping tab of the Plant Project Database Mapping Extension panel.
Copying and Pasting Mapping
The Plant Project Database Mapping Extension provides the ability to copy and paste mappings. This can be usefull if you already have crerated a mapping for a class and now want to create another mapping for a class that derives from the first classs. Example The class MIXER is a derived class of class EQUIPMENT. You already have created a mapping for class EQUIPMENT and now want to have a mapping for class MIXER. For that do the following steps:
- Right click on class EQUIPMENT in the class tree and select "Copy Mapping" from the context menu
- Right click on class MIXER and select "Paste" from the context menu
- All mapping information including mappings for properties is copied to the new Mapping for class MIXER.
By default this new mapping is set to "disabled". This is a precaution since an exact copy produces a conflict with the original mapping. The Select, Update, Insert and Delete statements would operate on the same rows of same tables. The new mapping needs to be modified to contain proper Class Definition columns and Obligatory Columns.
Assigning mapping to class
If a class is renamed while the corresponding schema mapping is not loaded it becomes disconnected from class because it references the previous class name. Such mappings are listed in the "Summary" tab under the "Unknown classes" section. For example if class "EQUIPMENT" is renamed to "EQUIPMENT_1" while the corresponding mapping is closed and then the mapping is opened class EQUIPMENT_1 will be classified as not mapped and the mapping for "EQUIPMENT" will be listed under "Unknown classes".
If to click on the "remove" hyperlink then the mapping is removed. Alternatively it is possible to assign that mapping to another class. For that right click on class "EQUIPMENT_1" and select "Assign Mapping..." from the context menu and select the "EQUIPMENT" mapping in the popup dialog. The mapping will be assigned but initially in will be set inactive.

⇒[[Plant Project Database - Relationship Mapping| Next Plant Project Database - Relationship Mapping]]
⇑[[Plant Project Database Mappings| Up Plant Project Database Mappings]]