| Applies To | |||
| Product(s): | AutoPLANT P&ID | ||
| Version(s): | All | ||
| Environment: | N/A | ||
| Area: | N/A | ||
| Subarea: | N/A | ||
| Original Author: | Bentley Technical Support Group | ||
Overview
This Technical Bulletin will describe how to modify and add a new Actuator to this list.
In P&ID when a Control Valve is placed the user is prompted to select the Valve Body and its Actuator. Once both are selected the user can select the OK button and these components will be placed.
Actuator Picklist: The Actuator pick-list enables you to define the Topworks for a Control Valve. Any Actuator symbol can be matched with any of the Valve Body symbols. The selected Actuator is previewed in the Image Tile on the right as it's slide.

Overview of modifications needed:
We will be working with five files during the process of adding new Valve Actuators.
1. C:\Documents and Settings\All Users\Application Data\Bentley\Plant XM\P&ID\PID-SUP.LSP
2. C:\PROGRAM FILES\BENTLEY\PLANT XM\P&ID\AT_PID.SLB
3. C:\PROGRAM FILES\BENTLEY\PLANT XM\P&ID\Valve Actuator Block
4. C:\PROGRAM FILES\BENTLEY\PLANT XM\P&ID\Valve Actuator Slide
Step 1: Creating a New Actuator Block
1. In native AutoCAD draw the Actuator as you would like to appear in P&ID
2. Zoom > Extents around the newly created Actuator.
3. Type WBLOCK and select the Insertion point where you will want it to intersect the Control Valve Body.
4. Select the Valve and save the block in the C:\PROGRAM FILES\BENTLEY\PLANT XM\P&ID\SYM\ location. In this example we will use myact.dwg as the block filename.
Step 2: Creating the New Actuator Slide
1. Open the newly created block. In this example we will open myact.dwg.
2. Zoom > Extents around the component.
3. Type MSLIDE at the command line and save the slide in C:\PROGRAM FILES\BENTLEY\PLANT XM\P&ID\.
NOTE: The filename MUST begin with ICV-. This is an internal system value.
NOTE: The filename MUST be a total length of 8 characters not including the file extension.
Example used in this document: ICV-MYAC.SLD
NOTE: All Actuator slides MUST be stored in C:\PROGRAM FILES\BENTLEY\PLANT XM\P&ID.
Step 3: Add the Newly Created Slide to the AT_PID.SLB Slide Library
NOTE: If the AP-SLB.EXE is not located in the C:\PROGRAM FILES\BENTLEY\PLANT XM\P&ID folder please copy it into this location from C:\PROGRAM FILES\BENTLEY\PLANT XM\BIN. The AP-SLB.EXE must be in the location of the slide library/slides.
NOTE: All Actuator slides MUST be added to the AT_PID.SLB slide library.
1. Open a DOS Window. Start > Run > Type CMD and select OK.
2. Once in the DOS Window browse to the C:\PROGRAM FILES\BENTLEY\PLANT XM\P&ID folder. I.e. CD C:\PROGRAM FILES\BENTLEY\PLANT XM\P&ID
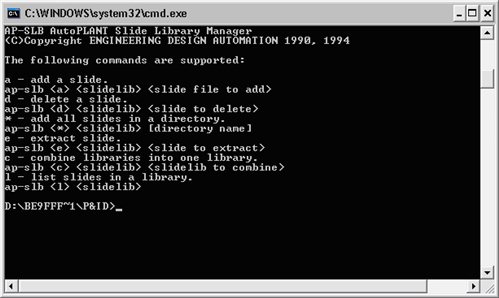
3. Once in this location run the AP-SLB.EXE file by typing AP-SLB and hit Enter on Keyboard.
4. Notice the options below in the screenshot. The command A will add a new slide into the slide library. The L will list all slides in the library.
5. To add the slide to the AT_PID slide library run the following at the command line:
a. NOTE: Substitute your slide name instead of icv-myac.slb.

Review:
1. Block has been created and is in C:\PROGRAM FILES\BENTLEY\PLANT XM\P&ID\SYM.
2. Slide has been created and is in C:\PROGRAM FILES\BENTLEY\PLANT XM\P&ID.
3. Slide has been added to the AT_PID.SLB Slide Library.
Step 4: Add the New Actuator to the PID-SUP.LSP File
1. Browse to and open the C:\Documents and Settings\All Users\Application Data\Bentley\Plant XM\P&ID\PID-SUP.LSP. This is what controls the dialog in P&ID.
2. Once opened search for "sldcod". You should arrive at the following section:
;; SLIDENAME W/O ICV- DESCRIPTION BLOCKNAME
cval_body (list (list "GAT" (at_msg "Gate" "PID_1299" 0) "GATE" )
(list "BAL" (at_msg "Ball" "PID_1300" 0) "BALL" )
(list "GLO" (at_msg "Globe" "PID_1301" 0) "GLOBE" )
(list "BUT" (at_msg "Butterfly" "PID_1302" 0) "BFLY" )
(list "ANG" (at_msg "ISA Angle" "PID_1303" 0) "ANG" )
(list "3WY" (at_msg "ISA 3 Way" "PID_1304" 0) "3WAY" )
(list "4WY" (at_msg "ISA 4 Way" "PID_1305" 0) "4WAY" )
(list "2WO" (at_msg "Angle" "PID_1306" 0) "OANG" )
(list "3WO" (at_msg "3 Way" "PID_1307" 0) "O3WAY" )
(list "4WO" (at_msg "4 Way" "PID_1308" 0) "O4WAY" )
(list "MYAC " (at_msg "My New Actuator" "PID_1308" 0) "MYACT" ) ;;;; NEW ACTUATOR CREATED
3. Please note this exercise has added the last line.
a. MYAC in BLUE is the Slide Name minus the ICV-.
b. My New Actuator in ORANGE is the description found in the dialog.
c. MYACT in RED is the Block name.
4. Save and Exit the PID-SUP.LSP
Step 5: Test your new Control Valve Actuator in P&ID.
1. Open P&ID and place a control valve with a new actuator. The new actuator should show in the slide section of the dialog.
See Also
External Links
Bentley Technical Support KnowledgeBase
Comments or Corrections?
Bentley's Technical Support Group requests that you please confine any comments you have on this Wiki entry to this "Comments or Corrections?" section. THANK YOU!
Under section 2- in the notes it says the file name must begin with "ICV". It is unclear if the ICV would be for all types of slides or if a slide for a valve body, inline device, etc. would have a different prefix. If there are different ones then a list would help.