| Applies To | |||
| Product(s): | Microstran | ||
| Version(s): | V8i | ||
| Environment: | N/A | ||
| Area: | User Interface | ||
| Original Author: | Bentley Technical Support Group | ||
Windows Terminology
This item introduces common Windows terminology and explains the basic operations that are part of every Windows application.
1. The Mouse
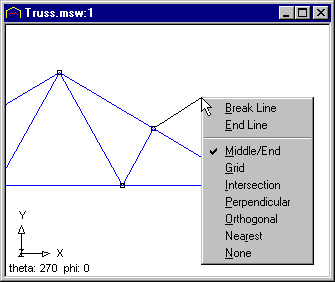
Clicking is pressing and releasing the left button on the mouse. This usually selects something. Double-clicking is clicking twice in quick succession, and this usually selects something and initiates some action, such as running a program. Right-clicking is clicking the right mouse button, and this usually causes a context-menu to appear. The context-menu is also known as a pop-up menu. In the example shown below, after the last member is drawn, a right-click displays the context-menu from which an item is chosen to terminate the drawing operation.
Dragging is pressing the left button, moving the mouse, usually to select something, and then releasing the button. Objects are selected graphically by clicking on them or by enclosing them in a selection box created by dragging the cursor from one corner to the opposite corner. Text is selected by dragging the I-beam cursor across the text.
2. The Desktop
The opening screen in Windows is referred to as the desktop. At the bottom are the Start button and the taskbar, and arranged on the left of the desktop are shortcuts. A program may be started by clicking the Start button and choosing the program name from the menu that appears, or by double-clicking the equivalent shortcut.
3. Dialog Boxes
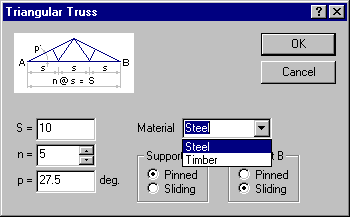
This is a typical dialog box from Microstran. Like most windows, it has a title bar containing a title or caption. There are two title bar buttons, one which closes the dialog box and the other for obtaining context-sensitive Help. Under the picture of a truss are two text boxes and a spin box. Text boxes are also known as edit boxes. A spin box is a combination of an edit box and an up-down or spin control. Static text fields are used for labels. The term static means that you can't change it.
In this example, a drop-down combo box is used for choosing the truss material. Initially, it looks like a text box with a button on the right-hand side. Click the button and a list box drops down; click on an item in the list box and the list box closes with that item selected in the text box. When an item is selected, its color changes, usually to white text on a dark blue background.
At each end of the truss the support condition is determined by a pair of option buttons, also called radio buttons, in a group box. When you click on the empty button, it becomes selected and the other is automatically deselected. There are often more than two buttons in a set of option buttons and they are invariably enclosed in a group box.
List boxes are often used in dialog boxes to display a number of items. In a single-selection list box, you can only select one item. If you select another, the last one you selected is automatically deselected. In Microstran when selecting the input load case, for example, you can only select one load case. A multiple-selection list box allows you to select more than one load case when you are choosing load cases for an analysis report.
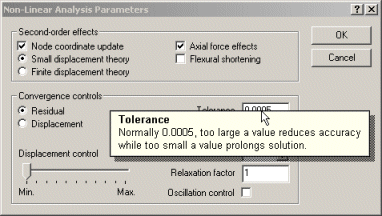
Here is another dialog box from Microstran that shows a pop-up window containing context-sensitive Help for the item that was clicked. At the top, two check boxes containing check marks are just visible, and at the bottom of the dialog box is another unchecked check box. Check boxes are used for independent or non-exclusive choices. Notice the slider, used to adjust the value of a control parameter.
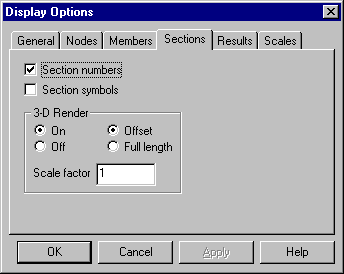
4. Property Sheets
A property sheet contains a number of property pages, each of which is similar to a dialog box. The property sheet is sometimes referred to as a tabbed dialog box. When you click on one of the tabs at the top of the property sheet, the corresponding property page is displayed.
5. The Clipboard - Cutting, Copying, and Pasting
![]()
Most Windows programs have these three buttons available on a toolbar. They are for cutting, copying, and pasting. There are usually corresponding items on the Edit menu. Shortcut keys, also known as accelerator keys, are also provided for these very common operations - CTRL+X for cut, CTRL+C for copy, and CTRL+V for paste.
When some text in a text box is selected, cutting or copying will place the selected text on the clipboard, a temporary store for transferring items from one place to another in a Windows application, or from one Windows application to another. Cutting will clear the original item but copying will leave it unaltered. When the caret (the text insertion point) is located in a text box, a spreadsheet cell, or any other valid target, the paste operation will insert the clipboard contents at the caret.
At the simplest level, copying and pasting can be used to save typing in a text box once you have entered the desired item elsewhere. It can also be used to transfer ranges of cells to or from a spreadsheet or a data grid. See How Can I Exchange Data Between Microstran and a Spreadsheet. Cutting, copying, and pasting may be used in the Microstran text editor, MsEdit.
6. Page Setup, Printing, and Print Preview
Page Setup is performed in Microstran and it involves setting printer, paper size, margins, text size, number of print columns, and page orientation for both reports and graphics. Microstran prints only to the Windows default printer and print preview is not available unless a default printer has been selected. The Windows default printer is selected initially in the Page Setup dialog box - if you select a different printer, it becomes the Windows default printer for the duration of the Microstran run. The original default printer is restored when Microstran terminates. The printer selected for Microstran will be used the next time Microstran is run.
Print preview provides an exact display of the printed page for both reports and graphics. Notice that there are Print and Preview items on both the File menu and the View menu. Those on the File menu are for reports and those on the View menu are for graphics. Clicking the printer button on the main toolbar prints the view.